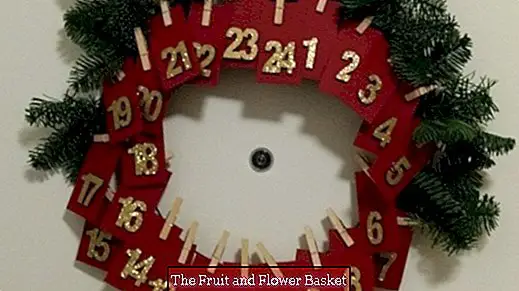
Advent calendar as a door wreath
Maybe this tip is still pretty much in time for the Advent season and can make the selection to design a door wreath just a little more difficult.
The idea had been in the (summery) drawer for so long - now it was finally time. As already several times please refer to instructions and work steps the texts below the pictures.
Here are just a few remarks that I could not accommodate there:
- For the fonts google under? Font Christmas Free Download? or? Fonts Christmas Free? - the selection is pretty impressive! You can delete them later after using yes again from the computer, so that it is not completely filled. Maybe even note (at least for me that was so): The fonts appear in Word only after a restart of the computer ...
- At first I had? Normal? large wooden clips worried these but distracted the view only unnecessarily from the contents of the cards, so I then used smaller.
- These and the glittering numbers can be used again and again later.
- After I had come here at least in my mental preparations, the advent calendar seemed to me to be too bleak, if only for 24 days had looked at him so. Finally, on a "real"? Calendar either opened a door or grabbed deep into a bag. So I also had to come up with something else: My cards should be turned every day? become! That's why I've written letters on the back of the cards that - day by day, becoming visible one after another - formulate a wish!
But how do you transfer the letters to the box?
Because the box was of such high grammage, I could not print the letters (squiggles ...) directly on it and then cut the cards. Therefore, I have printed all letters to use on normal paper, then individually roughly cut, placed on the back of the card, then both well and firmly held as always to break through against light, so that once again check the position of the letter could. Then I transferred from the printed paper page with a ballpoint pen only the contour of the letter on the box - and here only the lower, later black to be colored part - the area filling was done later anyway with special pens, so then any impressions were no longer (possibly disturbing) to see. I have done the drawing of the snow cap after drying the black paint free hand, here to let my creativity run wild! The snowflakes and delicate snow stars I have added as you wish.
Because I took for photographing, yes, all until then only with the number page to the viewer facing card, turn around and cling again, I came with the latter from time to time behind the numbers and have them involuntarily removed from the card? I used this to be able to press the number again with mini adhesive tiles - and this time considerably stronger.
One would have on the back of the cards instead of the letter z. B. also formulate small coupons? or attach in picture form ... Here are the creativity once again no limits set, except by the size of the cards ...
I wish you all a blessed Advent and Christmas time and enjoy crafting, baking and last gift!
I could make this door wreath very well, because I still had the wide metal wreath from last Christmas: He offered himself for this advent calendar!
Step-by-Step Guide
Steps 1-3
There are many instructions for binding loops in the net, so that this decoration part was made quickly.
Fortunately, a craft shop offered these wonderfully glittering and marveling figures with adhesive dots on the back.
To determine the size of the rectangles to be cut, I made the first paper try and used conventional sized wooden staples.
Steps 4-6
In the materials missing cutting mat and rotary cutter, the later used mini wooden clips, the replacement adhesive dots, then especially the pens (see Figure 10) and copy paper.
The cards are cut out of photo cardboard (300g / m2).
To make the wreath even more festive, have I put real fir between the metal rings? they can be replaced at any time in case of needles ...
Steps 7-9
So festively decorated, the front door presents itself from the outside and only waiting for the 1st of December, because then turned ...
For direct comparison, I have all the letters to use in the four "Christmas" ones that I like best. Fonts printed in the same font size.
Quickly did my family members decide on this font? Three different font sizes made me decide quickly to make the decision to measure the already cut red boxes.
Steps 10-12
Writing with black on red cardboard was effortless, but not every one of the white writing / painting pens could cover completely. and red snow's probably only in crime ...
I drew the contour of the snow hoods with the gel roller.
The coloring took place with the wider Edding 751.
Steps 13-15
A real joy was the setting of snowflakes and mini-stars!
And more and more the secret of the text is revealed ...
Here are some letters in detail.
Not only for the house community, but also for all FM users here are my best wishes for the 24th December formulated - funnily enough, when arranging the cards the Fehlerteufel crept in, but that does no harm, because when it's time, can I still swap quickly ...


