Decorating Eggs: Transferring and Designing Difficult Patterns
Transferring and Designing Difficult Patterns on Eggs - Basically, transferring patterns of all kinds to an egg surface works exactly as it did in elementary school.
Steps:
- Design / draw or print a pattern.
- On the back of the paper, paint all lines with a soft 4B pencil. The graphite is the means of transport!
- Place this paper backing on the right side of the egg.
- If there is a lot of curvature, cut the paper on the outer edges if necessary and place it round the egg surface.
- Lastly, trace all the lines from the right-hand side of the paper with an HB pencil (a ballpoint pen would slip onto the tesa film), and the graphite through careful pressure? transferred to the egg surface!
These steps are in my tip - because known - so not in the foreground.
Here's the actual tip:
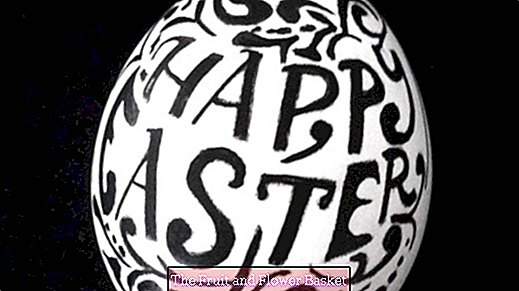
But why then go into transferring patterns at all? Here's the answer: I wanted to decorate each of my blown eggs on both halves with a different motif, so that you can turn the eggs in the Easter time and enjoy a different surface. At least for two of my chosen motives but could not (as described above) just go on? Pause ?. This is how the following tips have turned out. Especially the transmission of the English Easter greeting? Happy Easter? and those of the treble clef with the adjacent keyboard required a lot of attention. Both motifs were very complicated in detail? That's why I first had to make sure to change each motif in size so that it fits on the (and then very precisely) halved egg! It was also to be considered that not every blown-out egg in shape and size is like the other? and this alone made every motive for each other egg an individually coordinated approach required.
The third difficulty in my project was to be able to spontaneously drop the egg while painting so that it did not "roll" to the side on which the paint that had just been applied had to dry.
Let's start with the last problem:
There are several ways to use the egg to dry the colors - for sure? store:
- On my work surface is always an empty four-egg carton, in which permanently a? Sample egg? where I can always try out a pen quickly. Three compartments, however, are still free to lay just processed eggs so that their painted surface faces up.
- Luckily I came across a super construction during my preliminary research when it comes to laying the eggs almost completely without problems: Take a foam board (about 5-6cm thick) and cut one egg at a time four toothpicks vertically in: Now you can gently apply the egg to this? carrier? put down: It rests only on four less than a pinhead large contact surfaces (actually there are points) and so can dry around the same time (if you work with glue)!
- The third way to get a breather to dry the egg color is this: If you want to put an egg on the work surface for a short while, it will most likely roll over immediately and possibly onto the surfaces you just painted: All work is free, because the colors may blur immediately ...
In order to prevent this, the egg can also be placed on the table at any time, as follows:
To determine the longitudinal or transverse lines required for my project, and thus the egg halves, I just lay each egg in front of me on the table surface: Yes, after its center of gravity, it rolls a bit back and forth and stays in the correct one after a few seconds ? Position lie: Now I take the egg just like that = without twisting it into the hand and have quasi a "front or back? of the egg in front of me. Only then do I draw the longitudinal lines and / or? depending on the pattern? also / only the transverse line (equatorial line), which surrounds the egg at its thickest point.
This seemingly superfluous procedure has the advantage that later on when applying paints (which always have to dry again before drawing any further), the egg can easily be put out of the hand, without having to fear that it will be lost just painted surfaces rolls: If you put it on the still unpainted colorless back side, you know that it stays exactly the same (there you have previously identified the focus) - on the one facing front so the just applied colors can not blur !
Before transferring to the motif on the egg surface goes, must Size of the same first determined and, if necessary, the egg size adjusted (!). This step I have on the computer - there especially with the character bar? done.These steps can be read briefly for a student on a sheet (picture 6) in the photo series.
What should be considered when transferring the motif to the egg half?
The motive in the correct size should be in the middle of the half-eaves. For this purpose, I have with a rubber band, the longitudinal line to halving the egg determined: To draw the longitudinal line carefully with a pencil along the rubber band along.
Sometimes I have chosen a different method for this: Find the two poles of the egg and then connect them with a steady hand with a pencil through a line.
The poles can certainly be determined by rubbing the egg with a point on a graphite paper surface: If the impression is an area, you have not yet caught the pole? if the abrasion is actually punctiform, here is the narrowest end of the egg, so the pole.
Now you can go to really transfer the motive:
- Place this piece of paper with the motif printed on it around the egg as a sample and check once again if you like the size. Now remember that you can capture the motive on the egg so later only about ¾ of its size directly with a look, and the lateral sections are visible only by later turning the egg in its entire form. Depending on which effect you want to achieve, you can then change the size of the motif if necessary again, reprint it and try again on / around the egg ... Also comes here the personal taste into play, whether the pattern of the egg Front side and egg back directly at each other or not ...
- The motive? Happy Easter? In the very first attempt (as recommended in the net - grrrr) I transferred to a handkerchief paper? the tracing from the right side was impossible, because my motive was too detailed and the handkerchief too soft. So I tried it on the second try with printer paper? everything great.
- For the motif with the treble clef and the keyboard I had to pay particular attention to the fact that the dividing line between the treble clef and the keyboard runs parallel to the line connecting the poles of the egg when positioning on the egg surface.
- When painting or painting the lines / surfaces from inside to outside proceed: Then you can easily touch the egg at the poles and lead well. During the painting process, I have always tried to place the drawing arm on a book in such a way that the drawing hand with the pencil can be placed comfortably over the edge of the book and touch the egg well. The egg itself I have additionally carefully with his dry (!) Surface pressed to the pages of the book, so that it can optimally slip a little.
Some of these tips may be inspiring for imitation!
In any case, a busy and happy time!


