Do washable duster yourself (Swiffer alternative)
The commercial Swiffer are a good thing in itself, if it were not the problem that you have to constantly buy new replacement cloths, as they are very quickly dirty and then ex-and-hop in the trash land because you can not wash them. A homemade duster from old shirts or bedspreads is more sustainable, as it can be washed after use and then used again and again.
Especially for dusting lamps, pictures, toys or difficult to reach places like e.g. behind radiators Swiffer are really handy. It annoys me, however, that the Einmaltücher quickly soak and can not be washed. They can not be shaken out either. Therefore you take the next clean cloth and the old one is thrown away. That's a real waste. Using a self-sewn Swiffer, I not only used old fabrics, but also avoided waste and saved money.
Required material
- Lacquers made of roughened cotton, molton or flannel shirts (6 flannel layers 18 x 16 cm and 6 layers 18 x 15 cm)
- Pinking shears, scissors
- Used Swifferstab
- Sewing thread, sewing machine
- pen
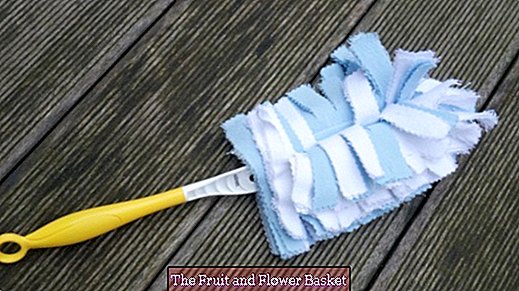
Feather duster made of flannel
The hand-made dust magnet is best used on one or both sides roughened Bauwollstoffe. Flannel attracts the dust well and is easy to wash. I cut six layers of flannel fabric roughened on both sides with a pair of pinking shears measuring 18 x 16 cm and another six layers measuring 18 x 15 cm. If you do not have pinking shears, you can also use a pair of normal scissors.
Place two pieces of fabric measuring 18 x 16 cm on top of each other, fold a third layer of fabric lengthwise and place it flush on the first two layers on the left (Picture 3), Place the duster holder in the middle and mark the fabric seam with a pencil on the outer right side of the rod. Then place the third folded layer on the right side flush with the two layers, mark the middle with a pencil, put the pole back in the middle and transfer the rod contour to the left on the fabric (Photo 4), Now the two pieces of fabric are sewn together on the recorded lines.
sew together
Begin with the seam only after 2 cm, sew 12 cm and do not sew the remaining 2 cm again. Do the same for all three seams. To check, push the rod into the sewn pocket. He should be reasonably stuck in his pocket so that you can shake out the duster outside, without it just flies around your ears. Now the remaining layers of fabric are placed over the already sewn? first the larger pieces of fabric, then the smaller ones. Sew together at the middle seam. Again do not sew 2 cm at the bottom and top. Fold the sewn-together fabrics one length at a time and, if necessary, cut them into shape. Finally, the pinking scissors cut 2 cm wide strips into the fabric. Now shake off the lint from the paper cut over the sink and the cleaning aid is ready for use.