FoldOver bag made of deco fabric and cork leather
When I discovered this e-book on the internet for a bag by Hansedelli, I knew: It had to be! And that I would hang the straps with only two Ringkarabinern, was also clear ...
The term ?foldover? translates to fold over fold ?: The special feature of this bag presented here is the upper third, which can be folded / laid at will to the front or back of the bag and therefore presented in a very different look. The bag can also be worked in such a way - from the materials as well as the colors and the outer design (printing, stenciling, embroidering, plotters) - that it has quasi two partially or completely different views, so two pretty 'front'? - where else is there!
In addition, you can leave the FoldOver part of the bag folded up while wearing it, if you just want to put on a thin cardigan on top of it - the bag will look completely different!
The work steps are not reproduced here in detail - if interested, please read in the e-book (not free-book) or design a cut yourself.
But for the manufacturing practice some hints and processing details:
- To attach the bag belt to the bag, see my modification with the ring karabiner (hook), which I detail in the hint? Achtung Taschenfans: Ring karabiner & Co.? have described.
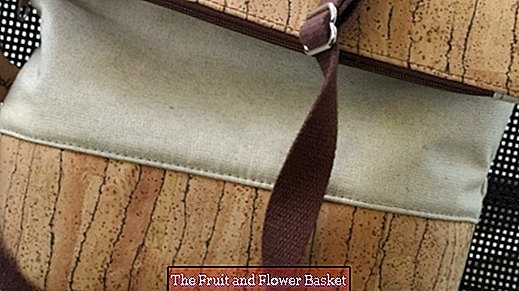
- Instead of always using only one and the same strap, I sewed a second pocket belt from the bright decoration fabric and half bordered with finished edge band, so that I am variable depending on the textiles to be worn.
- The upper third of the FoldOver bag, I once made of cork leather and on the opposite side made of decorative fabric, so here in color and material contrasts.
- The cork leather I stiffened at no point with Vlieseline, because it already has a great strength of at least 1.2 mm (when buying on the Internet necessarily here again read and compare?) - But probably the decoration fabric and the lining of the total bag.
- Because I was not sure what kind Vlieseline I should use for this, I ironed several on fabric remainders and after cooling in the hand taken: The haptic then was ultimately crucial for the choice - but here are the tastes different - artificial leather z. For example, would not I reinforce in general?
- Where we are already there: When I pack my fleece-line, I attach to each one a small piece of paper with the article description and above all the usage instructions: So I have all the information regarding ironing temperature, duration as well as the use of a damp cloth ready and need not always digging for the appropriate information?
- In the lining of the overall bag I have one zipper pocket worked in, for which I have chosen thick taffeta as a pocket fabric, so that the on-slip slides well (pure cotton stops me too doll).
- This bag has a stamped logo on the inside. Although it is due to the FoldOver part relatively low in the total pocket, and you can see the logo (unfortunately) not so good, but I really wanted to have the feeling, here too time to spoil ?.
- For the label in the visible outer zip pocket, I have deliberately chosen another material, or tried out in terms of design, namely SnapPap: On the left edge I have one punch used and written next to it with Faber-Castell Multimarkern. These are offered in different thicknesses and of course colors and are waterproof in any case. Pen and thread color for the border are chosen to match the lining. Incidentally, you can also work perfectly with SnapPap with metallic and gel pens - (granddaughter) daughters have something like that ...
- Here is a tip, if small parts such as labels o.a. To be sewn on: On the back at two longitudinal edges Stylefix Attach. So nothing slips, and you can safely do without sticking.
- It was clear that I would also attach a visible label on the outside of the bag. Since I now own many stamps in different sizes, I could try a little. The result is a two-page label. For this I have on a wide cotton tape in the (previously tried) distance the? Contents? stamped, so that after the buckling of the twill tape, the label then received two different pages. I did not wash the cotton tape before, because this bag is not washed anyway? Likewise I have not washed the entire lining, because the finish has ensured here for an additional rigidity.
- The small sign (similar to a @ sign) I designed myself and online from a stamp shop As a stamp can be produced: So I can position it again and again on the materials to be printed and combine with other stamps - or as here with handwritten text.
Online stamping is a nice gimmick, because good companies offer everything: choose the stamp shape (round, square?), Choose the stamp size (diameter or edge lengths), of course enter the text in different fonts and sizes, the Change line spacing, single or multi-line stamps, add the stamp area from a border in different shapes and thicknesses to a preview, which of course can also be printed out. The great thing is that you not only rely on templates (see above), but also upload self-designed files and with the text? can combine! As a result, each stamp is already unique! By a naturally offered? Preview? do you have one? Stamp ever in? Real? Size and layout on the desktop, but of course it can also print out and make any changes before sending the order. All of this is just fun - and a voucher for an order from such a company is a nice gift for the sewing? Girlfriend - or ?! Since such manufactured stamps are custom-made, of course, that you can not exchange or complain?
When stamp ink I use only the high quality of VersaCraft: There are small and large ink pads (2.5 x 2.5 cm or 8 x 5 cm) and then in super many colors. This stamping ink can be used on fabric, paper, wood (!) And other materials. Fabric z. B. but should be prewashed, because then the color is better absorbed. After drying cover the stamp imprint with kitchen paper and iron for 15 seconds: Now the color is permanently fixed and the textile can be washed at 30 degrees!
Here again the note for transferring the stamping ink on the stamp: Do not press the stamp in the pillow, but on the other hand, gently press the ink pad several times, if necessary, on the stamp. So you have control over how much color gets on the stamp and hopefully nothing on the edges / edges of the stamp, resulting in an unclean, so unusable result?
At the Sewing a label into a side seam (Quernaht is of course also) pay attention to the following:
- push the label with the later out of the pocket outstanding part in (!) the pocket interior, so that only the seam allowance of the label comes out (see photo). After later turning the bag or the outer fabric, the label then comes out completely by magic - the seam allowance is then inside
- no matter if vertically or horizontally incorporated, the label should not accidentally be upside down
- Since it was important to me, that mobile Without being able to get away with a lot of trouble, I worked my inner pocket into the lining, which finally got so high that the phone does not tip out. can, as is often the case with purchased bags.
- My zipper has a 5 mm spiral and fits in its width so well to the processed rustic fabrics - here you can play with the materials of the spiral? - what's allowed? s: plastic, metal - with or without tip ??
- At what distance the zipper is incorporated to the fabric edges, of course, also affects the appearance of the bag: I myself prefer a little distance, especially as some zipper tapes have a pattern in it, which I did not want to present. Please take this into account when measuring the individual parts of the bag or when sewing them together?
If you sew the bag, please do not scare after rough completion and taking in hand, if the FoldOver part does not lay down so good: Once the bag hangs on the body, it adapts to the rounding and that FoldOver part lays down automatically (puhhh?)
When my bag was ready, I would have liked the laterally attached pocket suspension lowered: Then I could have folded the top pocket part (FoldOver) a little wider down, because the fuller it is packed, the more difficult the folding folddown Part or it seems to be narrower. You could - to counteract this - the foldover part from the outset just slightly higher cut or attach the bag suspension just lower to the bag.
Speaking of FoldOver part: It does not have to be worked at an angle on the edge, but can be sewn straight or slightly rounded? Even there are no limits to the imagination and the taste.
The finished bag measures at its lower edge over the width to be seen 22 cm. Unfortunately, I let myself be fooled by the pattern, because of the width of the paper cut pattern was still cm for the pocket depth. Unfortunately, a normal boy does not fit lying down in the bag, and with a not a little filled culture container, the bag is already pretty well filled out anyway? If you like, you can change the pattern when buying something!
One thing is quite clear with this bag: or
You? Ll never walk alone, because there will certainly be a lot of attention on the way!
See you soon?


