Homemade 3D greeting card
That's what you need to make a 3D greeting card:
Fixed cardboard (the size depends on how big the card should be)
Wrapping paper (suitable for the occasion)
Crepe paper or tissue paper colorful and green (matching the gift paper)
1 sample bag clamp
Self-adhesive book cover or transparent package tape
glue stick
scissors
Compass (or a glass with a diameter of about 10 cm)
First, the cardboard is folded in the middle, so that a card is created - by the way, I always take discarded tabs for file folders - one side of a cereal box is certainly synonymous, at least has the appropriate strength.
Now the wrapping paper is used. It is cut into pieces, for example cut out as desired circles, or squares, the size of the pieces should be about 3x3 cm in size.
If you take wrapping paper with motives, you can also directly cut out the motifs, if they are a little bigger, that's ok :) I have already made a card with newspaper, looked great too!
These pieces are now the outside of the map pasted, if possible so that you can not see what it was before. If the inside of the card is white or monochrome (not gray), you can leave the inside blank, otherwise it will be covered).
One more note: If I get presents and I really like the wrapping paper, I'll save it - even if it's torn - it's still very good for such purposes!
Next: I have written a spell in Word that should be in the foreground. "Happy Birthday" or something similar - a Word Art, so I could paint the letters or print it out colorful. This will be glued on the front. The personal congratulations for the inside I wrote with my hand on a white sheet of paper, cut and pasted into the card ...
As a "seal" now comes the self-adhesive book cover film into play. This is now glued inside and outside. This also prevents something from falling off again.
Now the 3D effect:
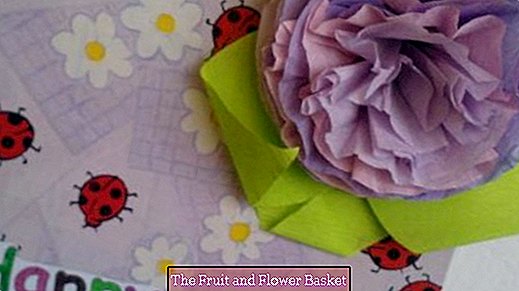
Take the crepe or tissue paper, fold it a few times and draw a circle (about 10 cm in diameter) and cut out the circle. By folding, you now have several circles. It takes about 8 circles for the flower, (the more circle one has, the "fuller" the flower becomes) the flower in the picture is from 9 different colored circles.
Now fold green crepe or tissue paper so often that you have 4 to 6 layers, paint a leaf shape on it and cut it out. At the lower end of the sheet has a small hole, which I have fabricated with a sharp pair of scissors.
Now you put all the circles on top of each other and "fabricated" with the scissors in the middle of a small hole. Through this one pushes then the sample bag clamp and afterwards the leaves (a bit offset) and bends the clamp on.
Now put the unfinished flower in front of you so that the leaves are down. Take the top circle and crumple it up, the same with the next circle and the next ... until you have all crumpled (please crumble each circle individually!).
Now you pluck the circles a little bit apart again and in shape and the 3D flower is ready.
Now you also "fabricate" a small hole in the card with the pair of scissors, at the point where the flower is supposed to go, the clip bends again, pushes it through the card and bends it inside the card again.
And finished is a self-designed card and you can be sure that no one else comes with the same card :)
Everyone can let their creativity run wild here. For a youth initiation card, I would make a small envelope and stick with where the money comes in.
You can craft figures from foam rubber, which also give a nice 3D effect.


