Make felt cover for photo album
Instead of just giving away a photo album, according to the motto "As seen, so bought," I wanted to sew a nice cover to the photo album, which creates a memorable value. The material was immediately felt FELZ. Luckily, my research on the Internet revealed that the traditional, inexpensive felt to buy in handicraft stores was not what I should use. This felt from the hobby area is the so-called craft felt, which is quite different in strengths to buy. Since my shell but many years ... outlast and from the many in-the-hand-take not rub off, I became immediately aware of the so-called design or wool felt.
Wool felt is a natural product in which sheep wool or wool fibers (sometimes with a small proportion of rayon) are further processed into a uniform, flat textile structure. Depending on the supplier you can get wool felt in thicknesses of 1-6 mm - as a piece, as plates or blanks (made to measure). Wool felt is according to the manufacturing process in high quality shares in the price not to compare with craft felt. In contrast to the latter, he does not pill, does not rough (I have always wondered why, for example, laptop bags that I have seen in others, despite the use of how new looked - now at least that's clear!
Because wool felt can be produced in different degrees of hardness and I did not know, which strength is most suitable for the shell and how my sewing machine would handle it, I had a company send me samples (do this very often - recommendation !!!), so I could make the decision in peace at home: It fell on wool felt of thickness 3 mm (of course, without impregnation and addition of binders as the Bastelfilz) - to sew twice so that was already 6 mm between presser foot and conveyor! For those of you who are more interested: The felt density is 0.28 g / cm³ (according to DIN 61200), the felt hardness M5 (according to DIN 61200) and the felt weight: 600 g / m² (according to DIN 61200). The material was dyed 100% wool felt (wool felt made from 100% Merino sheep wool) - a quality tested to Oeko-Tex® Standard 100. My "favorite felt" was offered in a cut that was suitable for me from L 90 cm x W 50 cm - ideal for the case. Favorite felt, because this felt was not uni gewalkt, but mottled, in addition, then the color choice was terrific and I could thus choose a favorite color of our granddaughter :-) I decided I also for a particular shop on the Internet, because the Customers were guaranteed that the felt would be delivered rolled (and not kinked / folded, as unfortunately do suppliers of artificial leather and / or cork).
So, enough of the rapture of the material, because the most important thing is still: my "production process":
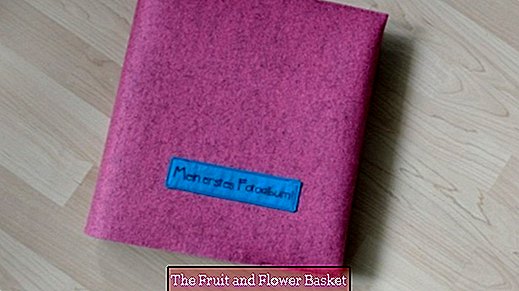
- Label front and label select and finish both - not yet sew ...
- cut the felt surface for the cover exactly = according to the present photo album.
- Lettering (front of me) and the label on the felt surface attach and
- Finally, stitch the four short edges that make up the album's impact
The cover of the photo album I wanted out of only a piece of felt Sew, which is only at the two open vertical edges of the photo album in each case ... centimeters turned inwards (sketch color GREEN). This impact is then quilted open-edged on top and bottom of the front of the case and on the back. So there are only four small seams to create and see permanently (see drawing - there color BLUE): finished is the cover!
- To measure it, I have the purchased felt cut wrapped around the photo album and at both open edges - like a normal book cover - put around in the eye and taste towards the inside. I did not measure anything, but I rely only on my impression for the breadth of this "impact". I have marked the well-considered "ends" of these impacts with pins, then opened the felt surface = and removed the photo album.
- The total width of the blank then results from the felt surface measured from pin to pin.
- Because the purchased blank was wider than mine unidentified Measure, I have now cut off the protruding felt remnant: The width the area was already right.
- Why did not I measure this measure (required width) directly on the photo album? Because the felt is so clear thick As a normal cotton fabric, it consumes with each turn around edges or bulges (back of the photo album) because of its volume / thickness so more "fabric" than, for example, a normal thin cotton fabric. Therefore, in such a case it is always advisable to work on and with the original material and to measure it.
- It was more difficult to find the needed height, As you can see on the sketch, I wanted the short Edge of the impact / (in the sketch GREEN drawn) yes open-edged under the front or back of the surface. Roughly estimated I have at the upper and lower edge of the felt surface to be cut as a precaution 1cm to the measured height Due to the fact that the photo album edge has a thickness of about 3 mm thick, the two short edges (color GREEN) must grab around just this edge "until they can "meet" each other, ie they can completely lie on top of each other, only then can you step through both layers and the impact is firmly connected to the cover or the back of the felt surface (drawn in the BLUE sketch)!
- Because this measure of a total of 2 cm extra was an estimate, I have Not euphorically all four impact edges are stitched one after the other, but only the two lower Stitching edges sewn, d. H. the two, the lower Edge of the photo album can be seen. Attention: normal Needle, but 100 - try stitch length before - yarn quality and color also ...
- In order to finally determine the height of the felt surface, I pushed the photo album into these half finished strikes, then viewed from the side and measured with a hand measure how many inches I needed to fabric for the top two to be sewn short edges (BLUE) : Puhhh - luckily I could and had to cut off from the first felt cut at the top of the entire longitudinal edge 0.5 cm with the rotary cutter.
- Then the two upper short edges were turned inwards and stitched tightly (sketch color BLUE).
Create caption of the album in the printer
Of course you can text - or embroider or write by hand - I have chosen to print fabric in the printer.
- For the text on the title page, I printed (it was spoiled for choice!) Several fonts and decided in the exclusion process for ultimately two possible.
- So I put the text in printer printed on fabric, I roughly cut a piece of fabric (larger than A4) and ironed it as well as possible. Because the printer would not be able to transport the fabric due to its low thickness, the back side of the fabric will be treated with so-called Fixing Stickvlies ironed (see photos) - even this slightly larger than A4 size. After cooling down, I cut the fabric + fleece with the rotary cutter to exactly A4 size. To ensure that no lint remains of the fabric get into the printer, I have finally finished this fabric embroidery fleece surface carefully from the inside out with a lint roller.
- The Stickvlies remains when printing behind the fabric and stabilizes it, so that the printer recognizes him as a slightly thicker paper and feeds well into the shaft :-)
- At the printer make the desired settings: A4 paper size (of course it is synonymous with A5!), For me then still "upright". As a precaution, make a test print with paper and / or check the preview / preview, because if the fabric is first in the printer, there is no turning back, and with a wrong attitude, all work done for free and fabric and fixing fleece for the trash can.
- Before actually loading the fabric into the printer, check on which page is normally printed, d. h. how the printer feeds the paper: yes it is on the Printed fabric side and not on the embroidery fleece surface ...
- If all is correct, open the paper tray / feed and the fabric (as the printer requires) on the existing ones stack of paper put - never just the fabric piece!
- Now as always on the computer to give the print command: tata !! If all presets are correct, the fabric would have to leave the printer as printed!
- Leave fabric and let it dry - if necessary iron under baking paper. Since in my case the fabric is not washed, no post-treatment of the substance is necessary.
- Carefully remove the fleece from the back of the fabric :-)
- Fixier-Stickvlies is available in well-stocked department stores or in need (postage costs) on the Internet ...
Sew on the label
- After cooling, cut the printed fabric surface to the desired extent including seam allowances. Personally, I ironed this fabric surface with Vlieseline F220 and then crashed with identical fabric.
- At will, d. H. Sew on the outer surface of the felt cover with perhaps a slightly thicker and / or contrasting yarn.
SnapPap label
One of the photos shows how I did it. The handwritten text should be framed by two small stamps - I have tried this after coordination with the color of the SnapPaps and only then decided on the final color. First make the SnapPap a little bigger and after labeling ... cut it back to the desired size. Again quilt at your discretion and existing yarn ....


