Raised bed for vegetables - many benefits
Growing vegetables in the raised bed has many advantages, especially if the bed is laid out correctly.
advantages
- pleasant working height
- higher and longer harvest yields in a smaller space
- Pests like rats and voles stay away
Most advantages of the raised bed arise from the heat development of the bed itself and its elevated position. For the raised bed must meet a few conditions:
requirements
- Ground contact. Are not suitable tubs or standing on stands or tables "raised beds". Closed systems, except one, allow no exchange with soil organisms.
- The layering of various decomposable materials inside the raised bed serves as drainage, insulation, composting booster, fertilizer and pest repellent. In addition to important nutrients, composting creates additional heat in the bed.
- The best is a south-south alignment of the longitudinal axis to allow maximum sunshine.
- Advantageous is a "windscreen"? at a distance of a few meters north of the bed, such as a hedge or a wall to keep out the cold wind.
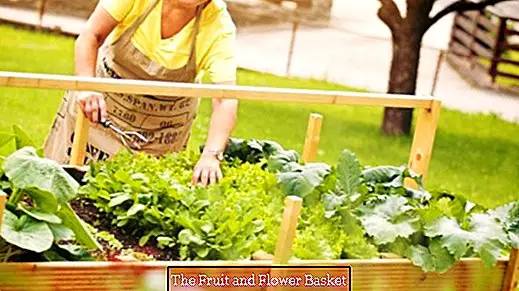
A simple raised bed can for example be made of wooden boards and four posts. It should have a comfortable working height (70-100 cm) and should not be wider than 120 cm so that it can be well managed from all sides. The length can be varied as desired.
The best way to build the bed after the tree and / or hedge trimming in early winter, as branches, branches and foliage can serve great as a stuffing. Clever is to keep even the last lawn cut, which one can still need.
Anyone who wants to build a cheap raised bed measuring 200 x 120 cm and wants to avoid introducing poisons of solvents and plastics into the soil needs to build a raised bed:
- spade
- Big rubber mallet or heavy stone
- Tacker or small staples and a normal hammer
- untreated wooden boards, e.g. Cladding boards from the hardware store, 200 or 120 cm long (number depends on the width of the boards and the desired height of the bed)
- four wooden posts, which should be about 25 cm longer than the bed should be high
- Rabbit wire in the size of the raised bed area plus an addition at the edges of about 10 cm
- Screws and a screwdriver or cordless screwdriver
For the filling one uses:
- leaves
- thick branches and smaller tree trunks as well as branches
- turf
- garden soil
- Compost (like in different stages of maturity)
Especially important is the wood as drainage, the soil and the compost. If you do not have one or more of the remaining fill components to choose from, you can improvise. My raised beds I have in the absence of green waste and turf e.g. filled with rotten horse dung, straw and weed out.
The 2 x 1.2m large bed will be quite heavy when assembled, so it may be useful to build it directly at the site and not screw together first. However, if someone can help with towing and setting up, is it easier to lay the bed? zusammenzuschrauben.
That's how it's done
- First you lift a pit of 2 x 1.2 meters about 1 spade length (20cm) deep. This ensures that there is an "intimate" contact with the ground. When the bed is set up on the lawn, it is best to gently pry out the grass sods and put them aside - they will have their appearance later. The earth is still needed.
- Place the posts in the pit (use a hammer or a heavy stone to knock well one hand deep into the ground) and connect them to the outside of the boards. Alternatively, you screwed the sides lying and then put the bed finished in the pit. Then you climb into the box and lay out the rabbit wire on the bottom of the bed. The overhangs are folded over and stapled or nailed from the inside to the high wall. So the rodents have to stay outside, but the access for the hard-working helpers like earthworms and microorganisms remains open!
- If you have foliage, now fill a layer of about 5 cm in height in the bed. Then comes a maximum of 30 cm high layer of branches and branches. You can even use tree trunks if they are not too thick (up to 15 cm in diameter). The whole thing is now filled with garden soil. So that it penetrates as well as possible into all cracks, one can rain one or two watering cans full of water over it ?. This layer is followed by a 20 cm high layer of foliage and the lawns (with the? Meadow? Down). I did not have any foliage or turf and instead I filled a 30 cm layer with a mixture of straw, weeds and soil in a ratio of 2: 4: 1.
- Then there is a 15 cm high layer of rotted compost. Since I did not have enough of it, I used more soil and well rotted horse manure plus a few handfuls of dog hair (as nitrogen fertilizer) and made the layer a bit higher. The last layer consists of at least 15 cm of garden soil, which is mixed with mature compost / humus. Then you can? lospflanzen!
That sounds like a lot of work and you should plan four to six hours of work for the first bed when all components are available (getting faster if you have done it a couple of times). But this time you get out by good crops out again. In addition, you can dispose of the "garden waste"? save because they have great benefits as a filling.
Of course, a raised bed of untreated wood has a shorter lifespan than one of treated wood, round wood, metal, stone or plastic. To delay the decay, you can the inside of the "raw wood bed"? also with foil lining. We did not do that because of soluble substances in the plastic and are now working on the very simple beds in the second year. The wood is gray, but not yet attacked.
Even with moisture loss we have surprisingly no problems, although we were everywhere predicted. We have e.g. very successfully pulled tomatoes in three raised beds without a protective roof and poured even in midsummer a maximum of 1.5 watering cans of water per bed (300 x 120 cm). The earth on the sides quickly dried about 2 fingers wide, became hard and kept the water perfectly inside the bed.
The material in the bed sags several centimeters every year. Then fill the beds with ripe compost and soil. If you regularly mash with pieces of vegetables (with tomatoes, for example, with spiked shoots and leaves), is the "loss"? Of course, the Earth is lower. In addition, mulch keeps the soil moist and releases nutrients.
The filling material is consumed after about 6 years? and should be renewed. The content is then perfect garden soil, the z. B. can use for the flat beds. In the raised bed, however, soil alone makes little sense, because the end of rotting no longer produces heat and supports plant growth and health.
Fertilizing (except with mature compost) is unnecessary in raised beds. If you still want to do something good for your plants, you can simply make a manure from nettles and comfrey and apply them diluted with the water from time to time. But I would not start that until the third or fourth year, because the soil is more than "fat" at first. is.
I hope, I could give the inveterate and / or biological gardeners among us a hot tip and look forward to your reports and ideas!