Spice drawer made to measure
Spice drawer made to measure: fixed, effective and cheap!
For this tip you need:
- Transparent, flat drawer inserts (for arranging cosmetics or jewelry made of transparent, multiply divided hard plastic (you get at the boxes, at Ikea), as needed. Cost, to have for little money. (I mean, for something um the euro.) For my 50 cm (width) and 48 cm (depth) drawer I needed, a total of 2 of these deposits.
Important: But as a precaution, better calculate two times, if the plastic at the later time, when pruning, should tear ... It happened to me, so I had the same replacement.
You also need:
- Extremely stable / massive scissors, or ideally, a very sharp Cuttermesser (Pflaster also ever ready for an emergency.)
- Thin-writing markers / CD markers e.g.
- ruler
- If necessary, some sandpaper or sandpaper
- Depending on the size of the drawer, you will also need other open household boxes (freezer boxes without lid, for example) for the subsequent addition of your own set and for the complete filling of the respective drawer.
How do you proceed now?
- First of all, think carefully about which products you have, how big they are and how much space you need outside of these drawer subdivisions.
- Then you take (if you also larger fans later wish you) the household boxes / freezers of the size accordingly. This puts her to one side of the drawer first. Then you try with the "Ikea drawer inserts" directly to tie.
- That means you take the folding rule, measure the distance from the empty drawer side to the outer edge of your already inserted box and then have the measure, which your Ikea drawer inserter should have later.
- Tip: If you now add a few more millimeters, the later cutting edge can ideally disappear later under your box. Thus, an unclean, not straight or uneven edge remains invisible.
- Now that you have measured, you can now also the later cut edge marking with the marker (each above and below, each a fine thin line, set as a marker line.) Remember the millimeter addition, if you later everything in one piece, not want to have visible.
- Now it gets a bit dangerous ... and you should definitely bring strength and possibly in case of emergency plaster (!). Now just cut along your mark. (Due to the plastic and the respective indentations / in itself that is not quite so easy through the respective subdivisions, and requires a little patience, good tools and also strength. (Who would like to whom the cut edges are too sharp, then can these edges Sand it gently with the emery paper, but if you still have extra edge, this is not absolutely necessary, because it disappears (if you do it right) later automatically in the drawer under the inserted box. (Thus, this operation is not absolutely necessary. )
If you have done that, then your first order hurdle has already been taken. You've crafted a custom inlay (a custom drawer insert) for your drawer and made it cost-effectively. Perfect for arranging small parts.
If you wish it clearer then you can expand it even further, as I have done as described below:
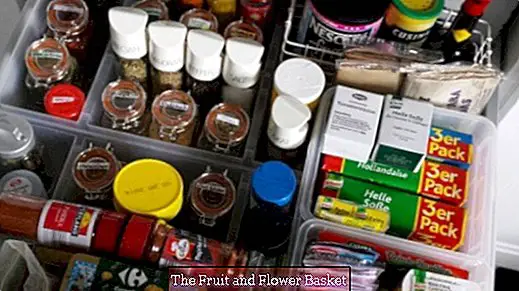
I have to, at the Dutch-cheap discounter "Action", 3 packs of 4 pieces mini-glass container (on the package is "Stock and Stove" - each € 1.89 per pack) purchased.
These jars are, in principle, mini mason jars. (Have a rubber ring around the glass neck and a well-known from the beer bottles of the past or even from the preserving jars, metal train, which let the respective glass by snapping, also equal airtight.)
These glasses are otherwise relatively expensive individually. (Single unit price is at Nanu-Nana at about 0.99 cents!) For my needs, I have therefore kept to the "action" offer, and me 3 packs (ie a total of 12 glasses) secured.
At home, I then thoroughly rinsed it out, allowed it to dry out and then I put all "refill packs of my spices" and "my herbal and dip mixes" into the jars.
So that I now knew which spice (in which jar), I have provided the heads of the lid with the respective names of the spice / herb. (For the dips, I have the mixing / dosing instructions, cut short and laterally glued to the glass so I still know now, in which mixing ratio I have to touch these.)
These glasses I have selected have several advantages:
- They close airtight. Aromas are preserved and the spices stay fresh longer. (Only when dosing you have to be more careful! - By knife tip, for example)
- Moths should now find it particularly difficult to get at your content and if you do, you'll see it right away.
- You can also stack the jars on top of each other.
- You can see right away which spice is where it is, it is clearer, easier to get at hand (and it also makes it visually, something).
- You can put the jars in your self constructed grid / drawer inlay. Thus, they do not fall over in the drawer, (not even if you let the drawer fall with some momentum), and you can make the best use of the storage space (which is also around it).
Additional tip:
From an old Gewürzkarusel, I still had these hangers left. As you can see on the final picture, I put it high behind it. (Since the lettering is on the side, I can still see exactly which spice is still behind my glass, so I use every given millimeter effectively and my drawer looks even more professional ;-)
How you, but in the end create your drawer, is your business! With me a lot of storage space (clever solved), broken bags were history and the overview now, I think, speaks for itself. In addition, this resulting division seems quite "attractive". For such customized solutions you pay otherwise, at the kitchen interior designer times really expensive money.
Now I wish you a lot of fun with the "optical kitchen upgrade" and create order!


