Top hems with the twin needle
In this tip, I would like to introduce the so-called twin needle (ZN) and my experiences with it, to encourage many of you to try it out and certainly to get the taste.
The ZN is used very often if you want to create a beautiful hem that is both visible and decorative at the same time and - in the case of elastic fabrics - also produces an elastic seam (which is a must for garments that are close to the body).
About the twin needle
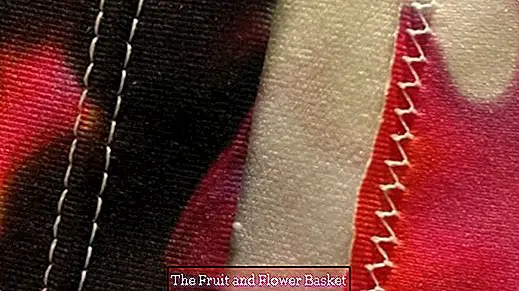
- A ZN consists of two equally thick needles, which are attached at their upper end next to each other on a single piston. This is - as with any other sewing machine needle also - inserted and screwed into the designated needle holder on the machine. Because the two needles keep the distance during sewing, the result is a beautifully even seam, which consists of two visible parallel single seams.
- For the two needles you also need two upper threads: one for the left and one for the right needle. For working with a ZN, however, a single bobbin thread, which is inserted as usual. This bobbin thread runs in the middle of the seam formed exactly between the two upper threads: Here it is moved back and forth and connects the two upper threads in the manner of a mini-zigzag stitch, which is therefore visible only on the back. The bobbin thread exerts a certain tension on the upper threads. This is not a problem with woven fabrics, but with jersey this can lead to minor problems (see below).
- The ZN is for each (!) Normal household sewing machine - no matter which model is in front of you - a satisfying pleasure!
- Twin needles are available in a variety of widths, with a distinction made between woven (normal), stretch or leather, denim and metallic yarns. On the following listed website you have a wonderful overview of all types of twin needles and their use of ... to: //www.naehwelt-flach.de/Zubehoer/Maschinen-Nadeln/Zwillingsnadeln/
- Many books do not elaborate on the threading of the two upper threads, but I have had good experiences with the following procedure: Both threads individually, d. H. Threaded one after the other, in a slightly different way, so that they can get as little tangled as possible: I take one of the threads in the hand (he should later be threaded into the right needle), let him slide through the thread guide, then lead him to the pass the right (!) side of the tension disc and thread it into the right (!) needle. The second comes as always to the thread guide, but then left (!) Passed on the tension disc towards the left (!) Needle and threaded there. When putting the foot under the presser foot, do not let the two threads slide over each other, but consciously continue to lead them next to each other. Then make a drawing test, if both threads slide smoothly and without hook through the machine - phew, that's done!
- Now, with both threads threaded, pay attention to the presser foot and needle plate: Check that the openings in both parts of the unit allow both twin needles to "work" through without slipping anywhere. So you can not work with a straight stitch foot because it only has a single small punctiform opening for a single needle. Also, the needle plate must be adjusted and have a correspondingly wide recess so that the two needles of the ZN pass through.
- Before sewing with the ZN maybe iron the fabric, because then the quality of the stitch is better and you can see the result better.
- Even with a ZN you can secure the seam by sewing backwards, but then lift the presser foot when pulling out the sewing material and do not pull out the fabric somehow, as usual, but touch the three (!) Threads very close to the fabric, together with the fabric well hold and pull threads + fabric as a "package" under the presser foot. It may happen that the bobbin thread comes to tension and the seam is slightly beaded. Carefully pull the seam slightly longer from the right side of the fabric.
- For normal sewing with the ZN do not set a zigzag stitch, because the stitch of the ZN already has a certain width anyway and otherwise hit the needles on the throat plate and would break.
- Before sewing, make sure that you have not selected a zigzag stitch in the previous stitch or a needle position that has been moved to one of the sides.
- When sewing elastic materials such. For example, jersey must use a stretch or jersey ZN.
- With the ZN every stitch is always sewn from the fabric top, d. H. Lay the fabric so that you look at the right side of the fabric during the sewing process.
- Therefore, the hem should also like to be plugged from the right side of the fabric, so you can control exactly whether the stitches always be nice and even ...If I personally want to have a certain seam width, I put the hem only from the left side (so that I can measure the hem width incl. Seam allowance better), but put in the second pass all the pins on the right side and then work with the ZN of right here.
- Before I go further down to keeping the seam width, here's a note on the pins: Especially for jersey or thin fabrics that slip easily when gripping, I personally do not use the normal short pins, but always extra long and at the same time very thin glass head pins by Prym: They are 43 mm long (instead of the "normal" with 30 mm). Especially when inserting the narrow seams, I stick so that they cover a greater width of the fabric layers, so that the fabric layers can slip much less. Because of the length you can then handle them much better and pull them out again. The Prym needles are very pointed, can be very well pierced by the fabric, are very thin and leave only tiny holes that do not harm even fine jersey and whose holes you can not see after ironing. The glass heads are made of high quality Murano glass, absolutely burr-free and iron-proof. When used, they are particularly elastic and spring-back, so they almost never break or bend: //www.stoffolino.de/prym-glaskopfnadeln-st-1-0-6-x-43mm-20g.html
- To ensure that you sew on the right "place", the ZN does not reach into the void (ie not completely in the hem) and the seam allowance and / or the seam width during the sewing process remain the same, you can on the throat plate right of Needle apply a tape (I take a thin masking tape) and always align / align the edge of the fabric with this marked line. This is the only way the needle always has the same distance to the edge of the fabric and the seam is always executed parallel to the edge of the fabric, without sewing "snakes" and possibly seizing the needles: the seam is quilted at exactly the same width at each point ! Therefore, it is worthwhile to take a closer look at the needle plate: on many machines, lines with centimeters (sometimes also inches) are carved into the metal. These are dimensions: They indicate the distance between the needle point and this line. Another tip: If the desired distance line is not drawn on the throat plate, because the distance is just too big, then only the tape version (s.o) helps. To determine the distance to be used and thus the distance line exactly according to the desired dimension, lower the needle (in a ZN the left!) To approx. 1 mm in front of the fabric. Then use the hand gauge to measure the distance between the (left) needle and the respective marking line and move the fabric if necessary.
- From experience, I advocate never sewing very close to the edge of the skirt, because then there is a risk that the stitch may not run completely in both layers of fabric, but u.U. too far outside the hem area.
- Therefore, always sew a little further in the direction of the final hem edge - with just folded hem I still add 1cm seam allowance when cutting, so that I first step on the inside over the two layers of fabric and then the edge of the fabric just outside the finished twin stitch can cut with the scissors ("cut back"), so that the seam edge looks clean from the inside. Exactly how I proceed, if I want to cut a textile with the ZN: Turn hem in new length to the left - stuck and sew from the right with the ZN, then cut back the excess fabric from the back of the fabric.
- When working with the ZN, always sew slowly (possibly preset a low speed) and thus match the formation of the finished seam.
- Do not stretch the fabric layers during sewing, because the twin needle as such already creates an elastic seam anyway.
- Likewise also be careful not to push the fabric, because this affects any seam anyway.
- Who has, please use an extra push-in table, so that the fabric can not hang down on the side and the seam can be (even) with a ZN then evenly.
- The stitch length: the bigger it is, the more elastic the seam.
- If you can, then when working with the ZN, select the needle position "down" at break, so that slippery fabric is also held in the sewing breaks and you can take a critical look before continuing to topp ...
- With a ZN, you can also sew decorative seams, but because of the width of such stitches, you need to be careful: Do the two twin needles fit into the presser foot and needle plate at each point of the pattern? This can be tried out by carefully turning the handwheel and lowering the needle very slowly - never try to sew! In more expensive machines, there is the "double needle function", where you set the width of the ZN. This way, the machine automatically prevents you from sewing too wide zig-zag stitches ... (so much for the added useful features of good quality sewing machines that are worth the price).
- Choose the color of the lower thread as appropriate to the fabric color.The needle threads can be chosen at will and also rich in contrast and then achieved a great effect!
- Carefully press a hem edge (under a damp cloth in the case of jersey) - do not iron back and forth. The end product is just awesome and professional!
Here are the possible uses of ZN
- As a pretty seam on all hems.
- For attaching a bezel / bias binding to all cut-outs (neck-sleeve cuffs).
- As a decorative seam in the processing of leather / artificial leather: Here thicker needles choose - if necessary, leather needles and thicker yarn - then work in the middle over a fabric seam, d. H. the right needle of the ZN stands on the right, the left needle on the left of the fabric seam - just cool!
- As seam seam especially on bathing suits and Lingerieartikeln.
- As a decorative seam in the middle of a fabric surface - particularly attractive, if you then still (colored metal) used decorative yarns :-) - like with the triple seam = triple stitch (see photo) and the
- Sewing from Biesen!
If there is a "bead" on top of a ZN seam, then
- maybe even reduce the upper thread tension, because the bobbin thread so strong "pulls". At the bobbin thread (!) - Voltage I would not change anything, because often you get them no longer adjusted properly, and they must be readjusted in the context of a maintenance until again .. Until then, the machine makes nothing but trouble :-( or
- if present, insert / connect a top feed foot / top feed dog and / or
- give it a try, put sandwich paper under the fabric - tear it away later ...
I hope you enjoy trying out and discovering new possibilities - without magic!


