Make a notebook with Japanese binding yourself
In Japan, very nice patterns are used for bookbinding. They are not only decorative, but also easy to use.
To make a notebook with a Japanese binding two Din A5 cardboard with a thickness of one millimeter are needed. I used watercolor paper. But it is synonymous any other cardboard, the main thing is stable. Fold all Din A4 sheets once. Since I did not have Din A4 paper, I used 15 Din A3 sheets and folded them twice.
Then the closed sides have to be separated with a knife. 80 gsm paper is sufficient. Somewhat thicker paper (100 g / m²) is better in the beginning, because it does not break easily. If you want to make a photo album instead of a notebook, you can use thicker paper. The format does not really matter either.
Create a hole pattern card
If the paper is folded, a five-centimeter-wide cardboard strip (1 cm thick) is cut out at the height of the notebook and a hole pattern is drawn on the strip. First, about 1.5 cm from the left edge one centimeter from the top, one centimeter from the bottom and the center measured and marked in pencil. Then three more marks are drawn from the center upwards at regular intervals with a distance of approx. 2 - 2.2 cm. Between these markings (at a distance of approx. 1 cm), points are then drawn approx. 5 mm from the edge with the pencil. With an awl (Ø 2? 3 mm) holes are made at these points.
If you do not have an awl, you can also use a nail with a hammer to punch the holes.
Transfer hole pattern
Before the hole pattern is transferred to the book covers, they are first covered with colorful fabric or paper.
Then the hole pattern with the awl is transferred to the pasted cardboard. Please pay close attention to the front and back.
With blue linen thread a decorative stitching is only embroidered on the book covers.
Japanese bond (easy)
Thereafter, the hole pattern is transferred to the insides of the notebook. There are two possibilities for binding. The first variant is the simple one. The insides are superimposed on each other and held together with clamps. With the awl the sides are punched according to the pattern on the punched card. That does not work with the complete issue. You should make four stacks and punch piece by piece with the awl. If you want to punch everything at once, you can also drill the holes in the entire stack with a drill and a very small drill.
Cover the notebook with the cover and bind it with red thread. For this purpose, linen thread or thin crochet thread is threaded into a needle and a knot is made at the back end. The first stitch is led outwards from the first hole in the inside of the upper cover. From the upper book cover, the needle is guided to the opposite hole of the lower book cover. Pull the needle up through the lower lid and the entire handle. Now, pull the needle through the next hole in the upper cover and pull it back into the opposite hole on the lower cover and the overlying pages. Follow the same procedure until the last hole and then repeat it again from the other side, so that two threads per hole hold the book pages together.
With this binding even very thick pages for photo albums can bind well. However, the binding has a drawback: The booklet has less space for notes due to the wide inner edge of the binding and is somewhat unwieldy when scrolling.
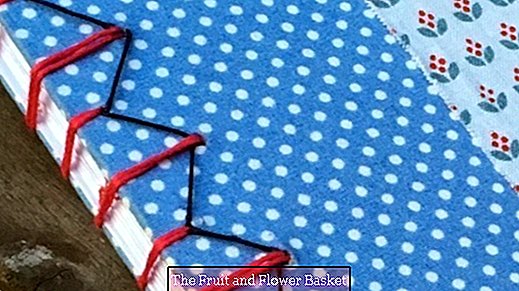
Coptic binding (elaborate)
In order to flip the pages slightly and the booklet remains open, one uses the so-called "Coptic bond". In this case, holes are drilled in the fold of the inside with the awl at a distance from the master pattern.
To tie the linen thread is pulled over some wax.
First, the thread with the needle through the first hole of the first paper layer from the inside out and out through the second hole pulled back inside. Then the thread is passed through the third hole from the outside back inside. Sew through this way to the end.
Sew the second seam back to the beginning.
Place the second stapling sheet over the first one, pull the needle right under the horizontal seam and pull the needle through the first hole of the second stapling position from outside to inside with the needle.
Thereafter, the needle is pulled from the inside through the second hole to the outside. In the other stapling positions, the needle is pulled through the knots of the previous situation and the needle is then guided back into the same hole inwards.
If all layers are connected to each other, the perforation of the template is transferred only to the first layer and the last layer. The red bar stitches are only pulled through the book covers and the first stapling position.


