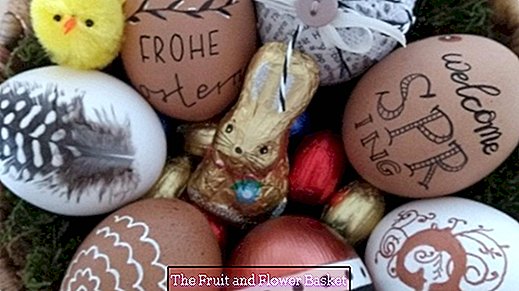
Decorate eggs in detail - Vorösterliche experiences!
This tip for highly detailed eggs, is something for "tinkerers" and patient with plenty of time for and enjoy the exact drawing of details? and then on a very limited and curved egg surface!
This tip primarily includes my experience in designing each egg with two different motif pages and especially in transferring and drawing an Easter greeting in English, in which the egg surface should be designed very detailed. The described experiences are transferable but also to other motives and brought a lot of noteworthy with it (as it had three (!) Egg starts needed until I was satisfied with the result or the egg has withstood my once too strong handshake and not broken anymore ...)
The actual transfer of patterns of all kinds to an egg surface works exactly as it was done in elementary school? That's why I do not go into it here.
Materials:
- different markers and eddings (see photos)
- Pencils HB and 4B
- printer paper
- Scale of paper
- if necessary Tesafilm
- pointed = oblong eraser
- sharpenable eraser pen by Faber-Castell Perfection 7057
- paper rest
- soft brush
- old (broken) egg
- Four-egg carton
- clean cloth
- kitchen towel
- Q-Tips
- Rubber bands with a small diameter
- Masking tape
If you like the project? Eggs? also so fascinated, then time and again make craft departments and / or manual work departments unsure and just look, which materials might be suitable for decoration. Also, and especially cheap stores have a well-assorted assortment of crafts, which sometimes changes and in any case is very inexpensive, so that there can be no bad buys here. Only if one has at all a selection of decorative articles and / or pens, the thing becomes exciting. When it comes to the size and quality of the eggs, I recommend a targeted purchase. For my purposes they wanted to be as big as possible. So I decided for (really) XL-eggs, which I could buy at the weekly market and then from the floor: The shell turned out to be significantly stronger than the other eggs when it was first blown out!
If you want to decorate several eggs? and maybe still different? then pay attention to and compare four things before the first manual work:
a) the egg shape
b) the nature of the egg surface
c) the number and size of the gepiksten holes and
d) the purpose of use
- Like to assign the pattern to the appropriate egg: Some eggs are much more bulky than others, some have the ideal egg shape - some come with a flawless smooth surface, while others are so heavily structured that on them the ink of pens possibly frayed ? would appear. In addition, with some decorated eggs, the hole will be permanently visible, in others, it may be obscured anyway by materials to be glued on it (newsprint, napkins, pressed flowers and the like). If the egg has non-removable stains or dings, use it for full or partial sticking.
- The surface of the eggs should be absolutely smooth for detailed, because clean contour rich character: So softly paint over it!
- Try the available pens on an egg surface and name them there. Do not put suitable pins in the same distance, so that you do not accidentally reach for the wrong pen (everything has already happened?). After drying the sample lettering, also look at the light diagonally from the side and compare the dullness and opacity of thicker pens.
Now it's time to draw yourself:
- If an egg is bilateral, d. H. on both halves should be decorated with a different motif, then take the not so difficult half in attack: Something goes wrong - the color pencil (!) slipping or smeared) or the egg is (as with me-grrrrr) even broken, You have not invested quite as much work. For the recommended order also says that you may be quite? and you realize that only while doing? on the actually desired motive ... must do without, because the conversion already this apparently "lighter"? Motiv is too difficult and you have to reschedule.
- Roughly mark or print the desired motif (do not black out on the reverse), place it on / around the surface to be used? hold and check if the size fits in the whole If necessary, make changes, try again, and pay particular attention to the vertical and horizontal orientation of the motif: For this, either on previously attached rubber bands, glue on painters crepe, draw short guides freely hand on the egg or using the cardboard device.
- Then only to the detail drawing? of the motive.
- Fix the durchgepauste motif with Tesafilm on the egg. If it is very large, at the strong bulges the paper for better transfer of the motive may.cut so that it can better adapt to the curvature.
- All motifs? keep the designs, those in different sizes and those already blackened on the back, well, until you are done with the egg-embellishment project completely: Maybe you need or would like to use it again ...
- If one presses the blackened side on the egg, holds on and then nachfährt with a pen all the lines, it is not sufficient because of the small and still curved surface that after removing the blackened paper not only the important lines appear blackened, but often still the gaps between them. The actual motive was so often only to guess. Therefore with the sharp eraser carefully remove all blackened areas that are not painted / redrawn before the first final color stroke!
In summary in four steps to the color:
1) Blacken the original on the back 2) Trace 3) Make corrections with the eraser pen 4) and draw in color last!
- Basically (in right-handers) put under the right forearm such a thick book that the drawing hand (here the right) can hang together with the pen so over the edge of the book that the pin comfortably reaches the Eifläche and you get it there as usual when writing on a sheet can lead well. Make sure that the pen is placed absolutely vertically (to create a thin line) or that a surface is painted in which the stylus can also be a bit slanted.
- Then lay the egg next to this book? like on a non-slip surface, maybe a clean cloth or household paper.
- Immediately before this arrangement put a small container into which both the egg (to prevent rolling away during the drying of the paint) as well as the currently used pen (vertical ?!)? Filed? can be.
- Use a dry cloth / paper to wipe off the fingers of your left hand frequently (it holds the egg) and use them very often!
- If, despite all efforts, there are gray-black spots appearing on the white ice surface, moistening a Q-tip and picking up excess ink with it, or if the ink has already dried, remove it with the hard end of the eraser pen? not over already drawn lines.
- The erased residues? Do not wipe off the eraser, but gently dust it with a (very clean) soft, wide brush.
- Rub the eraser repeatedly on a piece of paper and clean it in this way, so that the old, previously recorded color is not transferred to the newly cleaned egg the next time you erase it.
- If you have enough eggs available, then try on a white / brown egg pen strength and compare the shades? I have z. B. found that? Copper? the brand Edding not equal? copper? from the pentel touch pen is ...
- If the subject to be drawn has a specific, sharply contoured area, first record the outline using thin gauze pencil lines. In the first round I tried to trace these lines exactly with color. But this proved to be a bad idea, because the eye has no anchor points when looking at a very empty area and the line is always shaky somewhere, despite the best preparation for guiding the pen. and the perfect border is just a wish! From then on, I drew with a medium-fine pen as close as possible from the inside of the surface to be painted up to the pencil boundary line while keeping the pen slightly oblique, so that he may already paint the surface a little ?, the point but approaching the contour.
- As soon as the inside of the area is completely filled with paint, you have to retighten the boundary lines with a super-thin pencil or balance the wobblers. This is much easier then the above described attempt!
- Rounded / round to circular faces are very difficult to form on the outline with an exact contour line, because you would normally have to re-attach the pin (which would have to be on closer inspection: the line may not have been hit exactly This makes it a wobbly and is thicker than desired by the later balancing.Here it helps? I have the from my sewing projects - the curved line only to draw as far as the hand effortlessly allows, lift the pin from the line, the egg turn the pen from the inside of the surface with a small straight line on the line to be drawn and then paint clean on the line again? repeat this regularly ...
If you want to draw circles around the egg, try to make sure that it works with the box and the skewer (trapped in it) (see my tip: Bringing many circles perfectly onto an egg?).
- In order to draw along sharp edges / straight lines, I had taped the egg with Washitape in the first attempt.Unfortunately, after painting to the Washitape after leaving the same slight traces of the ink are left behind: the calcareous surface is too porous! Later, I came up with the idea to use the painter's crepe - it's just awesome when decorating eggs: easy to apply, removable without residue and then repositioned! Make sure to carefully press the first 2 mm of the later delimiting edge of the band with the thumbnail in the direction of the surface hi to be painted, so that almost no "waves" are created. are more present, which actually result from the vaulted Eifläche (want)? Carefully peel off the painter's crepe only after the color has completely dried. If several tapes have been glued overlapping to delineate a surface, this? Backwards? pull off: The last glued tape first, then the tape underneath, etc. The color of all drawn lines / surfaces must urgently always dry before you take the egg again in the hand.
- Unfortunately, in this context, I did not come up with the idea of mass production much too late. H. to work on at least two eggs in parallel:
Series Production:
- Cover all eggs with painter's crepe (if required)
- Paint all the eggs one after the other: The first-painted egg dries? the second, third ... is painted? then pick up the first egg again? Meanwhile, the other two eggs can dry, etc.!
- Possibly. already remove the masking tape during the drying process of the first-painted egg ...
Tips for drawing and pens:
- After each use the cap of the pins always? Audible? to turn off? It happened to me at first that I did not think about it and especially highlighter painstakingly through pumping? and shaking have to be made ready ...
- In the middle of the project, do not exchange the used pen for a pen of another brand with large areas to be painted out? unless they have been tested in advance: If the paint has dried, you may notice differences in faintness when viewed closely from the side as opposed to a slight luster, and you may also see the approach of new lines already dried? that would be a shame.
- A great challenge when drawing on the egg is that the surface is curved and you can draw at any time as liquid as on a flat surface. So why ever try the pen depending on the curvature of the line all the millimeters lead / tilt differently? Also keep it completely vertical so that the maximum line width / amount of color is transferred to the egg and you are satisfied with the result.
- Draw the middle lines / surfaces first on the egg, because then the left hand can still touch the un painted egg well, without transferring color transferred and transferred to other places: Draw all inner surfaces and lines first, then on and on work towards the edges.
- Rotate the egg so that the right-handed person can use his pen to guide it counter-clockwise and onto his or her own body: this gives you good control over the pencil guide and a clear view of all other lines to the left. Depending on the lines, I sometimes kept the pen hand absolutely calm and turned the egg instead? to try on an egg? it's worth it!
- Anyway: turning? rotate ? rotate? To take this to heart leads to very good results, when it comes to? Longer? Lines goes. Do not think so, oh, the 3 mm line I can get there too? Already, the pin guide is not clean and the line is wobbly, because the drawing hand is not arbitrarily circular rotatable.
- Should a dark area retain small white areas in itself, then thoroughly clean these white areas with the eraser before painting the remaining area in black? afterwards you rub some of the black color away ...
- If lines are supposed to abut a surface painted in the same color, record those lines first, even longer than desired, so that they protrude into the same color area and are automatically covered when filling them. Thus, no even the slightest gap can be recognized or even a new application of the pen.
- If two broader stripes intersect, deliberately start the pencil in the intersection area with the first streak? the second as well: There are then (here) no blurring? or bumps in the line, because later anyway in full width saturated over it is painted.
I wish you wonderful Easter days!


