Design and manufacture packaging for a coupon
It was urgent to pack a gift voucher. Luckily I had many materials because of numerous drawing and handicraft work (which has been sacrificing tips for months here). So it took only a little creativity to design and manufacture the packaging presented here: An envelope in exactly this format, there is probably not, so I had to act. Frequent shopping at Pinterest made it easy for me to combine the useful (make the envelope) with the nice one (writing a letter = "lettern")!
Maybe I can give you a little inspiration to do something similar, d. H. simply leave an existing envelope behind and fold it according to the numerous and very different instructions on the net itself, stick it and label it individually! I have learned that this effort was well perceived by the recipient and appreciated (sometimes even more than the content)!
Photos for the tip? Packaging for a coupon design ".
Step-by-Step Guide
Steps 1-3
1. Please complete the following materials: household cloth (Zewa or similar), pencil, eraser, scissors
2. The paper used comes from a block that I could buy very cheap in a low-cost store. Every pattern on the front shows a large sheet inside! The backs are always unprinted.
3. I hit one edge of the box so that it protrudes a little farther than the middle of the coupon.
Steps 4-6:
4. I have then sized the width of the cardboard to be processed in such a way that it can be wound around the voucher once in width + 2 cm seam allowance? for superimposing the longitudinal edges.
5. The excess area is cut off. Because I also work with fabrics, I used the rotary cutter on the patchwork mat. Keep the leftovers section because of the high quality carton!
6. I slightly rounded off the lower edge of the later oblong envelope with a saucer.
Steps 7-9:
7. The fort cut sections here again at a glance.
8. At right angles to the long edges, you will now roughly bend along a ruler.
9. In the next step, then, this kink of the? Pretty? Side of the box from under a cloth with the Falzbein kinked. Because the cardboard is so strong, you can see the inside looking out, which of course I did not want to leave.
Steps 10-12:
10. That's why I unfolded the folded lower end completely and the inner surface of the? Envelope? cut away.
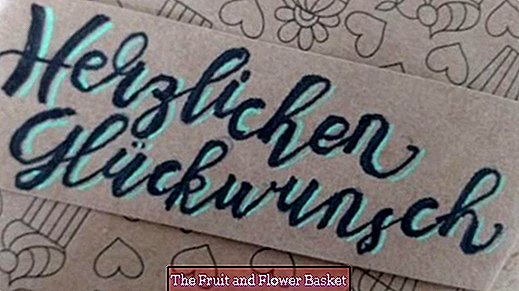
11. The result visible from the outside can be seen!
12. Now you can guess the shape of the finished cover: slightly bent at the bottom and cut straight at right angles to the long edges as a contrast. At height you can still play with the envelope? ...
Steps 13-15:
13. Therefore, I put the voucher on the packaging, checked the protruding cardboard residue on the short top edge for its length and slightly bevelled.
14. First, the longitudinal edges in the manner of a "seam"? glued on each other, then the short edge towards this? seam? turned over and also glued. If the box is very? Stubborn? is to complain the almost finished packaging and squeeze for a while!
15. The almost finished envelope is still open at the top? the bast is ready for decoration.
Steps 16-18
16. Put the voucher in the packaging: With the fingers you feel the top of the voucher (here along the folding leg), and then visually determine the visually pleasing height for the perforation.
17. Unfortunately, I still do not have punch pliers, so I had to make do with one end of the punch.
18. Now comes the details: I decided to use BAST as a loop band only at this time, but found this too bland and added a small bow (the rest of Christmas).
Steps 19-21:
19. I cut a narrow strip from the cardboard piece that was cut off at the beginning and then folded it so that it can be placed obliquely around the packaging in the length. Then I have the text written on it and the ends of the strip on the back - there at the maximum far below - stuck.
20. The date of birth and the donors are deliberately noted with a dainty pen so as not to distract from the pattern of the packaging.
21. Because the front is still brown to brown? For the first time, I took my newly acquired Posca markers into use and provided the lettering with a green shadow.
Here the desired effect in its full glory! Maybe I could give you a little inspiration to do something similar.


