Make enlargeable stitch markers from wool yourself
How to make a self-enlarging stitch marker made of wool is explained in this tip:
Since I have to knit up to 44 repeats in a row in my upcoming knitting project - a lacetuch - I can not help getting around stitch markers.
After a long googling I have strayed from the paperclip form as well as closed round rings, because the former, according to reviews bad close, break or can hook in the knitted fabric. The closed ones have the disadvantage that you can forget to remove them - then only ribbing helps ...
That's why, using the so-called running knot, I made my own stitches from thicker wool. These stitch markers are also ingenious, because you can change the size of the loop with which they are on the needle, depending on the needle size over and over again - so they are multi-size usable over many years (with KnitPro for example, there is a pack with an assortment of round closed stitch markers whose number and size would not have been nearly sufficient for my 47 reports ...). And besides: Plastic in such a delicate beautiful knit is not so tingling ...
Manual:
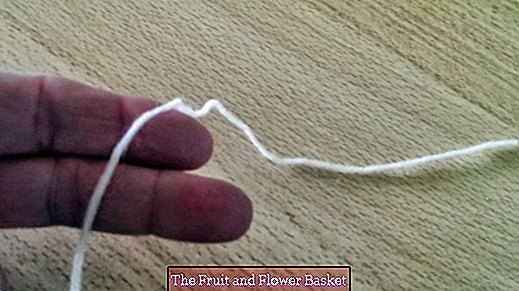
Photo 1 + 2: Take an approx. 15 cm long thread with the short end in the left hand and place the long end from the front to the back over two fingers of the left hand. Continue to thread the thread all the way around your fingers and place it over the initial thread in front: a loop is created. Hold this noose firmly with your thumb.
Now work with the long thread hanging down at the back: form a loop at the top of it (no knots!) And push it from below = behind through the large loop.
Photo 3: Remove the two fingers used for wrapping from the loop.
Photo 4: From the top with the right hand to get hold of this loop (Fummelkram) and pull through the large loop to himself - while the first = short thread end tighten slightly, possibly even the long end of the thread parallel to the first hold.
Photo 5: As long as the? New? Pull the loop away from the body until it closes by itself, i. forms a knot with the initial thread.
Photo 6: So that the new loop fits well to the needle size (ie not too loose and certainly not too tight), carefully pull on the leftover rest of the loop thread: As magic, the noose closes little by little - to the desired size!
Will be knitted later with a stronger needle and the loop must be enlarged:
Pull yourself on the loop until it has the right width! In contrast, if you want to make a smaller reduction, pull on one of the hanging ends of the thread (please try ...)
Possibly. Straighten the loose hanging thread ends. Store the finished stitch markers on a highlighter / safety pin.
Based on the photos, I tried to entice you to rework! Maybe a cute, small, but effective gift ...


