Bringing many circles perfectly to one egg
It is easter egg preparation time, so some patterns to be recorded entail that you want to bring lines in a circular form as a skeleton on the egg surface. But how do you make it, that after a few centimeters of the drawing they still "just" run around the egg and in several circles then always nice parallel to each other?
Masking with Washitape (narrow deco ribbons made of thin plastic) is certainly a good idea if you want to draw only a single line running around the egg (equator line). The further and more lines to be applied in the direction of the poles of the egg, here locks the washitape.
Even a rubber band around is only possible directly in the "equatorial line", because it would slip away at any other point.
Now and here so now the above announced solution that allows to draw a super straight circle around the egg in every (!) Desired height.
This is how it works:
- Take a box that is narrower than a shish kebab long (for stability reasons, the kebab stick must protrude right and left out of the box). If the carton is too high, simply cut it all around with the cutter until it has the height at which you can comfortably work on it without having to dislocate.
- Cut the cardboard on the two narrow sides with a pair of scissors / cutter approx. 1cm deep or cut out a small triangle from the cardboard box. This results in a recess in which the shashlik stick with the egg is put into it and can not slip from the spot. These depressions should be exactly opposite each other at both narrow edges.
- If the lines in the top and bottom of the egg are to have an identical distance (which may vary between lines), use the pencil (2B) to draw a small cross-stroke exactly on the egg where the first line will meet should. With a paper tape measure then determine the distance from this first line and mark again with a small cross-hatch the position of the next line. Proceed until all desired lines have been marked in their height / distance. But attention:
- If you do not want the lines to be drawn just as solid lines, but only as "guides" to draw ornaments along them, then calculate in advance how tall these elements will be, and do so when determining the line shape. Take into account distance.
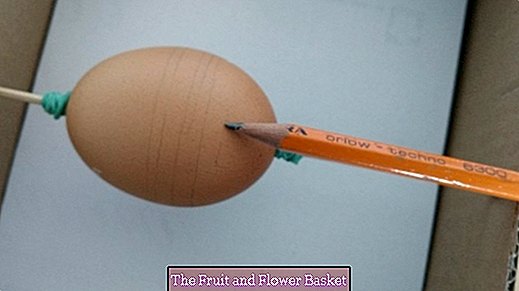
- The marked egg is now skewered on the Schaschlikstab and prevented from slipping on both sides by a rubber band - as it is known from childhood ago.
- The pencil (2B) is placed on the right narrow edge of the box and moved until it touches the egg surface exactly where the circle is to be drawn later. Now it's time to hold on !!!
- If you are clever, now turn the shashlik stick slowly and steadily with your left hand and hold the pencil in its position with your right hand - the circles are finished!
Sure: The circles on the other half of the egg are drawn by not taking out stick and egg and turning, but you just turn the whole box by 180 in the horizontal and continue to turn left and hold on the right!
If you like it, you can turn a partner and concentrate on fixing the pencil.
If you want to paint several eggs in series production and / or decorate them with circles and also work with (wet) colors, several recesses on the cardboard edge make sense: An egg is painted in color and can dry in one of the notches, the next egg can in the Meanwhile, be painted with circles (!).
Have fun trying it out - and one thing is clear: we want to see your results here. ?
Greetings from the craft corner!