Christmas card with ribbon and banner
This time, I had decided to make the Christmas card for a very nice people again with textile materials. I bought the folding card with envelope in A5 format so that I would have enough space for the design.
Like in the last tips I have here too study materials and steps in the text below the respective image packed.
Since I favored those of mine stamp ink I already had to buy the matching, 6 mm wide satin ribbon for this work - I already had everything else at home anyway. Fortunately, I was able to find a company on the Internet, which offered these tapes on 10-m rolls at an unbeatable low price and very low shipping costs, so that I have purchased (certainly more projects) equal bands in several colors.
The ones used here stamp are not ready for stamping? ready ?: The motive is not as otherwise permanently applied on the stamp block, but one buys the motives in the set (material silicone), places one of them on the back of a system to the appropriate grip plate, where it adheres seamlessly ? then stamping ink on it and you can start ... These silicone stamps can be immaculately cleaned under water and used as often as you want. You are under the name?clear stamps? or silicone dies?, as? silicone transparent stamp? or in a slightly flatter form as? Variov Temple? sale.
Matching to such stamps you still have to buy the respective stamp block made of acrylic, on which the stamp is applied - a one-time purchase, because only the motives are exchanged at will.
All my stamp colors are from the company VersaCraft - a stamping ink for paper, fabrics (!!!!), wood and leather, but also porcelain. The color can be permanently fixed by ironing - simply brilliant. It comes in 8 x 5 cm or 3 x 3 cm stamp pads. Who wants to buy such, I advise the small ink pad (then at a lower price, perhaps to a larger color choice), because you should anyway dab the ink pad on the stamp (not vice versa) - then you can also with the small ink pad area quite a larger motif area (stamp) in? stages? dab and gradually dye completely. At least the small ink pad is available in 34 colors - there are no wishes left!
If Folded Cards buy, these are sold in unfolded format, so almost twice as large as for later use. For the essential folding / folding of such a folding card, I will soon set a tip for paper lovers, so that the result of such wrinkles is also perfect: The card may not break here in any case, but on the contrary visually? Gently? close and does not need to be pressed down again and again ...
Only so much: The application of the Christmas tree was a lot more tricky than expected - but the end result rewarded me and hopefully with me the recipient!
Step-by-Step Guide
Step 1
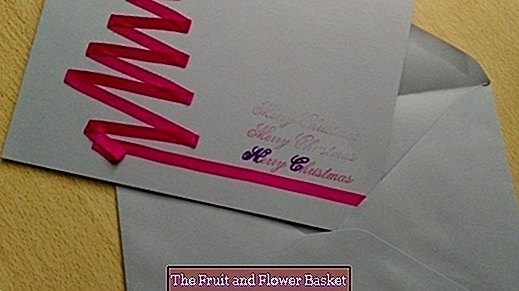
Picture 1 shows the result: A (purchased) folding card made of beautiful cardboard I have decorated on the front with a Christmas tree made of satin ribbon and a triple stamp.
In particular, the illustrated stamp areas are explained in more detail in the actual tip, but also in the next pictures.
Sample stamping on paper (which unfortunately had a different surface than my cardboard) proved to be too wide, so that there would have been insufficient space for the Christmas tree.
Steps 2-4
The actual stamp is lifted from the purchased template and placed according to the arrows (horizontally!) On the stamp block and sticks there.
The special feature of this upward paler motif: I have dabbed the stamp surface only once carefully, but then stamped three times in succession on the map.
The final, because narrower lettering was unfortunately only available in English. To ensure that the paint adheres permanently, iron under kitchen paper.
Steps 5-7
In order to see how the silhouette of the Christmas tree could fail, I cut a trapezoidal piece of paper and put it on the map - think of space for the star.
Roughly record the course of the tape with a pencil in order to get an impression of the tightness of the windings.
So that the tape is not completely detached from the roll and you have 10-m thread salad, a pin perpendicular max. stuck far into the role and so prevent the turmoil.
Steps 8-10
Still working on the paper: Fix the band with pins at the edges.
Arrived at the bottom, still on the band? Add cm for the length under the punches and finally cut to length = cut off.
Once again put next to the triple stamp: Is both matched to each other?
Steps 11-13
The side kinks? one by one = press each other in the form, because soon it has to be taken away from the paper and just then keep its shape.
Press the whole right half.
Turn paper and fir tree 180 degrees and press from the other side.
Steps 14-16
These pressed areas on the inside (!) With Stylefix and stick - bending for bending from bottom to top: This gives the fir-tree its permanent shape!
To prevent the tape from unwinding, use three pins (or more) along the outlines.
In the second step, attach Stylefix also to the back of the tree. To do this, turn the (very unstable!) Christmas tree - use the principle here like when falling a cake!
Steps 17-19
Before the actual gluing the back again a final check: votes the proportions?
Turn the tree over again and glue completely with Stylefix.
Once again on the? Right? Turn the page and stick it on the card step by step from the bottom of the tape.
Steps 20-22
Because the Christmas tree turned out to be too high, I cut off the top part of the strip (tilted to the right) to get enough space for the star.
Continue the long end of the tape to the right towards the inside of the cardboard, then beat around the edge and fasten with a star.
So that the now finished folding card wonderfully "closes"? So closed, under kitchen paper I have placed a folding leg in the middle perpendicular to the bent edge and here pressed down the box.
Steps 23-25
Then lay the folding bone flat and guide it to the outside with gentle pressure - the cardboard is pressed.
One last time the Falzbein again from the center, this time gently under pressure to the left lead.
So it presents itself to the eye of the recipient, when he opens the card!


