Patchwork potholders made from yarn leftovers
Who works a lot of hand, also has many leftovers. For me have collected from various projects small remains of cotton yarn. Since not all remnants have the same thread size, I did not want them at the same time? process and decided on a patchwork fabric. The result is potholders. In this project, four different techniques can be combined, namely knitting, weaving, crocheting and sewing. So it does not get boring.
You need
- different colored cotton rests
- knitting needles
- a crochet hook
- a darning needle
That is how it goes
Knit
First you knit 14 single strip patches with the dimensions of about 2.5 cm x 18 cm. (Picture 2)
In colors, just as the remainders last, it was with me
- 3 patches dark blue
- 3 patches turquoise
- 2 patches light blue
- 2 patches white
- 2 patches green mottled
- 2 patches blue mottled
For each I have struck 32 stitches and 7-8 rows kraus right knitted, so only right stitches in the back and forth rows and then chained off. For thinner yarn, it was 2 stitches and one row more, with thicker yarn, two stitches less. Let start and end thread a little longer, then you can sew the patches together at the end. If you can not knit, you can also crochet these patches.
Weave
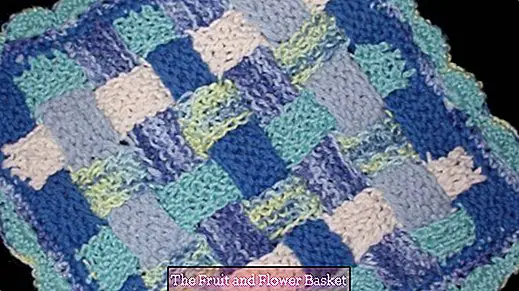
Now you put 7 patches (turquoise, white, green mottled) in strips next to each other, so that it creates a square. (Picture 3)
The other 7 patches (dark blue, light blue, blue mottled) are also laid in stripes, but across the first patches on top. (Photo 4)
Then you interweave the longitudinal and horizontal stripes together and secure each with a few stitches stitching yarn or safety pins before slipping. The result is a fairly dense square fabric that is double-layered at each point. (Photo 4)
Crochet
Then crochet a round of tight stitches around the woven square, squeezing both layers together, one horizontal stripe each and the corresponding 7 longitudinal stripes. Then you crochet a row in the "shell pattern": One tight stitch, skip two stitches of the preliminary round, crochet 6-7 sticks in the third next fixed stitch of the preliminary round, let go again two stitches and crochet a single crochet, then again into the third next crochet 6-7 sticks of the preliminary round. Repeat this until you are around. The best way to distribute the? Shells? so that the solid mesh is always positioned at the edge of the longitudinal stripes and the chopsticks in the middle. (Figure 6) I can not provide exact numbers because the residues used were of different thicknesses. In the one potholder (in total of thinner yarn remnants), I then crocheted a number of fixed loops over the shells.
Finally, crochet the hanger loop: When you have finished crocheting, crochet 15-20 crochet loops with a ply mesh back with the potholder, turn and crochet a crochet stitch into each bubble stitch, then re-join with a potholder. Cut the thread and pull it through the last stitch.
sew
Then it goes to the thread sewing. When sewing, it is important to close the resulting gaps in the fabric! Attention with potholders, it is very important that no holes remain behind. Wherever there are four patches, the patches could shift and there is a risk of burning one's fingers. Therefore, when sewing the thread, sew these places together. (Photo 7)
These potholders can be produced very well as a joint venture. The patches are easy and can be created by different people and sewn together by another. So you can participate in a whole school class. It does not matter if the kids knit differently. It still results in a varied complete works. Buy now  BONTHEE 20CM Potholders Washable Flaps for Cooking Baking Kitchen Accessories - Black 17.99? 9,99 ?


