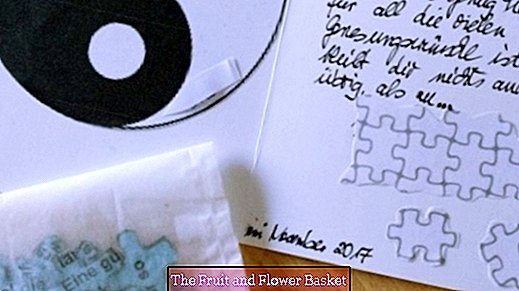
Recovery card as a puzzle
This card is designed so that I did not just write the actual text (which includes the good wishes for speedy recovery) on a card or even content myself with the word already printed on the front, but instead: I have the text on the computer put a puzzle grid, print it out, glue the print on a stabilizing paper and finally cut out the individual puzzle pieces.
Just bag and encase the card: Once again a new challenge for me - but especially for the sick hopefully a little change and encouragement during his rehab :-)
Materials:
- Calculator / printer
- colored typewriter paper
- colored construction paper
- cutting mat
- Cutting knives - straight and round (last with a super elastic blade!)
- simple glue stick
Steps:
To get to puzzle templates, I have first
1. googled and searched for a grid / area with pre-printed puzzle pieces as image and
2. This then inserted as a picture in a Word document. This surface seemed too small for my already pre-formulated text, therefore
3. I have copied the puzzle template several times, according to the contour of the puzzle pieces on top of each other pushed me and created an A4 sheet as a puzzle area (the text should fit over it later over it and at the edges still room to straighten the Puzzle area).
4. Then formulate the text and enter it in a (so-called) text box: This has the advantage that I later on the text already on / on the puzzle surface located - later still change and above all would be able to position arbitrarily! If you are interested in creating a text box and above all the great use of having such an explanation, please report, and I will try to put this into a new tip ...
5. Place the text box with all the wishes for recovery over the puzzle grid.
Then I made the mistake (and I write it here expressly that it does not imitate me anybody ...) to print this design (color / toner!), Because I thought that's it!
But then I noticed already at the first cutting attempt, that it was not possible at the small protrusions of the parts to bring them exactly in shape - they were simply too small and I would have had to cut for hours ... And what would be, if I did would miss next time ...?
So now the plan change:
6. Print only a few puzzle pieces in different sizes and try cutting - yes, that's it, because a direct comparison was possible (would have liked to be able to get on it sooner ...)
So once one of the puzzle piece sizes was set as a good crop, I got to the calculator
7. Create a puzzle area again and move the text (previously with a nice layout) over it.
But then I have the original layout? In the bin? and decided that the finished jigsaw would not be cut straight at its edges, as usual, but I would also cut out the edge pieces in their curved contours: the presentee has no chance of not jiggling at the straight edges when puzzling. To orientate pieces and must spend more effort (pastime!), Which simply distracts him only positive!
8. Specifically, this meant that on all four edges of the puzzle, I changed the flow of the text to such an extent B. would protrude only a single letter in another puzzle piece. That would mean that I had to cut out this (part of the puzzle!) Part with it ...
So, now that everything was controlled on the computer, we went to
9. Printing on normal strength colored paper (80g / m2)
10. Finally I was able to roughly cut out Puzzle + Text over it and lubricate the backside with normal glue stick (please do not leave any free space here, because otherwise this means that the text surface will separate from the ground when cutting and this only (!) Part) could not have been used ...
11.Fix the puzzle text area to colored construction paper for reinforcement, press very well and allow to dry.
12. Then cut up the puzzle area - I uploaded a picture in which I shared my experiences / preferences regarding the order of the "cutting steps"? have shown.
But then it says: bag - ready - give away!


