Make cream cheese yourself
:-) <- That's the Thomas. Thomas likes to do many different things in his spare time. Sometimes Thomas likes making quark or yoghurt or sliced cheese or white-blue cheese - that's something like Camembert - or sometimes cream cheese. Sounds strange, but it is.
Of course, Thomas knows that there are many cheeses to buy in the supermarket or in the department store, many of which taste great and are not inedible at all. Thomas also knows that such a homemade cheese is a bit more effort than getting a cheese from the supermarket, but that's the way it is, our Thomas ... And Thomas even knows that it's in this weird internet thing There are at least one million and twenty-three different recipes for cream cheese. But because Thomas was asked about his recipe in this internet-thing, we want to show you how he does it today.
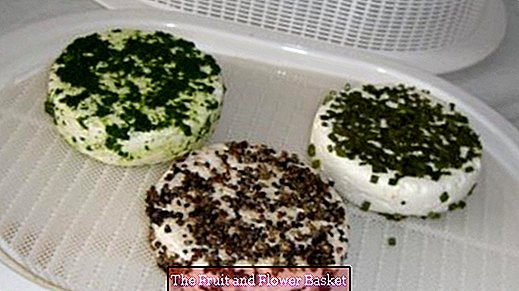
What should come out as the final result, you see above in the picture. By nature, the cheese is similar to the Boursin, so not quite ready to cut, but no cream cheese more.
(Well, now that style is enough, I can not stand it anymore).
The following ingredients are needed for the 3 cheeses shown
- 2 L fresh milk - *** no ESL milk (recognizable to "longer shelf life"), no H-milk ***. Even better would be raw milk, of course, but who can get there already ...
- 200 g of whipped cream, preferably a product without Carageen (there's mostly as organic product). The whipped cream can also be omitted, but with cream, the cheese is a bit full in taste.
- A little bit of thick milk or buttermilk or a suitable bacterial culture for cream cheese. I get mine from a shipment; But there's certainly also in the health food store. 6 drops of Lab 1: 10000, adjust the amount accordingly for other concentrations, also applies to laboratory pills.
- 150 g of salt
And for the "coating":
- garlic
- Herbs
- ground pepper
- Chives or what you would like to have on the cheese.
Needed tools":
- 1 cooking pot (stainless steel, do not use aluminum)
- 1 thermometer
- 1 long knife
- 3 to 4 types of cheese as shown in the picture (left) - something you can make yourself. How, I describe that at the bottom.
- 1 tub with a grid that can hold at least 3 to 4 types of cheese (see photo)
- 1 creator (ladle or better skimmer)
So, and now we go: (Preliminary note: hygiene in the "cheese kitchen" I assume, and you should always wash your hands before handling the cheese before.) On the same day you make cheese, it is recommended also not necessarily to work with yeast.)
First warm the milk with the cream to 33 ° C and stir either a small pinch of culture (5 mm on a narrow dipper stick) or 4 tablespoons (about 40 g) of thick milk / buttermilk. Cover on the pot but leave a small air gap; If necessary, clamp a toothpick between the lid and pot and place in the slightly warmed oven. The oven must not be too hot, if it has 30 ° C, that's enough.
Now let the milk rest for 90 minutes and acidify. Then dilute the rennet with a cup of cold water and stir in the milk. Stop the rotation of the milk as far as possible by briefly "stirring". Put the milk back in the oven and let it boil for about 100 minutes.
Now do a so-called "cut sample" to see if the milk is already solid enough. To do this, prick a wide knife diagonally into the milk and tilt it up a bit (the knife). If the milk does not flow right back into the hole at the edges, the milk is firm enough. If it is still too soft, rest a while (quarter of an hour or so) and repeat the cut.
If the milk is firm enough now, it will be cut. With the long knife cut a checker pattern to the bottom of the pot, edge length about 2 - 3 cm. The resulting columns can be divided in height, by pulling the knife still briefly obliquely through the milk, but need not be. Let rest for 10 minutes, then stir gently.
The break (ie the solid) should now have set off a bit of the whey. Let rest for another 10 minutes. Now place the cheese molds on the grid in the tub and carefully distribute the breakage with the creator on the molds. These are filled to the top, which collapses significantly.
After 2 hours, the cheese should be drained so far that you can turn it for the first time. To do this, gently push the cheese out of the mold into your hand and return it to the mold in the opposite direction. The cheese dissolves a little easier, if you previously "rounds" the cheese mold around a little bit. Attention: The cheese is still very soft and delicate in this phase! Repeat the turn every few hours, initially more often (2 to 4 hours), later less frequently (8 to 10 hours). So the cheese drips off evenly and gets a nice shape.
Regularly drain off the expired whey; the cheese must not get wet feet.The whey can of course also be used as a drink, but this is not so intense sour as the from the Quarkherstellung because of the shorter acidification time.
If it has drained 48 hours, the cheese is salted. To do this, pour the 150 g salt with cold water to 1 L and dissolve. (If this is too expensive with cold water (you have to stir for a while), the salt can of course also dissolve in hot water in time and then cool the solution.)
Put the cheese loaf in salted salt for 1 hour (turn after 30 minutes), then drain briefly.
So, now the cheese only has to be seasoned: either roll in crushed pepper (or sprinkle). You can also boil the required amount of pepper in a small pot with a small dash of water and let the water almost boil. Advantage: The pepper is a little softer. If you coat the cheese with the moist pepper, the remaining water adds flavor and color to the cheese. For chives, simply roll the cheese in fresh or freeze-dried chives.
For the herb-garlic variety, rub some garlic with a little salt, mix the herbs and coat the cheese with this mixture. Let the seasoned cheese dry for a few hours at room temperature. The cheese is now ready to eat, but it gets better if it is allowed to pass through it for a day or two in the refrigerator in a slightly larger container.
Enjoy your homemade cream cheese!
And here is the tip in the tip, namely for the production of cheese molds
I use now purchased forms, for the first attempts, but you can also easily make yourself: Just a few buttermilk cups (the firmer plastic, not this gossamer plastic cardboard parts) wash out and holes reinbohren. Diameter of the holes about 3 - 4 mm, number and pattern see photo of the left form.
For 2 l of milk, it is more likely that 4 cups are needed; The cheeses are getting smaller. Maybe it's also possible with 3 pieces, if you initially pile up a mountain while filling it, just try it out. By the way, I would drill all the cups at the same time; Just put them together and then drill.


