Pure pleasure with a free-arm sewing machine!
For some projects / sewing projects it is either very difficult or sometimes impossible to get the fabric under the presser foot and then get it transported. This happens when the fabric layers are too thick or the presser foot can not slide over the material sufficiently. This problem also occurs when the fabric is not a smooth, flat surface, but already has a closed (side) seam, so practically has the shape of a tin can (excuse this comparison, but then you just have a good Idea). How do you get a round piece in a straight shape under the presser foot, so you can sew straight?
So that you have an idea of what I'm talking about, here are some examples:
The sleeve of a shirt should be shortened. But at the hem edge it is closed in a circle. Shortening the sleeve by cutting is easy - but like the round cuffs - the fabric is indeed twice! - Get under the presser foot, so you can just with the straight stitch foot (!) Quilting a pretty hem edge again? Some seamstresses give up here ...
Even with hems on leggings or cuffs of blouses, the problem occurs or: If z. B. retrospectively - the gym bag is complete and ready - still sew a small application on the front or sew after a fall of the six-year-old a great patch on the jeans, this seems to / with some sewing machines initially impossible.
For advanced users of the machine there is often a sewing-technical solution for this, but it requires a lot of tact, practice and good nerves. I do not want to go into that at the moment, but rather introduce it with a special kind of sewing machine, which will more than increase the joy, the success and the variety (!) Of sewing - it is the so-called "sewing machine". Free arm-Sewing machine.
In order to describe the design of such machines better, I would like to go further:
If you look at the presser foot and then look down on the plastic case, you can see that the needle always stings into a small silver surface (and then comes to the fore again). This small part is the so-called. The transporter - consisting of a metal alloy and viewed from above almost rectangular. On its surface it has visible spikes, which can be felt well with the fingers. Turning the handwheel, you can see that the feed dog is moving - it is coming? Quasi out of a hollow from below, then pushes away from our body again, disappears in the machine and then comes out very far forward again. So the conveyor moves almost circularly and always away from us on the surface - good to compare with an escalator.
But now to the silver plate that surrounds the conveyor - they are called needle plate.
Under the stitch plate is on all sewing machines a part of the plastic housing - this is exactly this part of every sewing machine!
The special thing about the construction of a so-called free-arm machine:
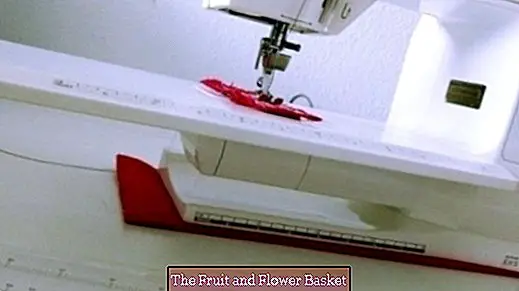
On some machines, the plastic material of the sewing machine extends from below the needle plate all the way down to the table surface on which the machine is standing. There is no room between this plastic part and the table surface - no space. Right here are the so-called free-arm machines built differently: The throat plate rests on a plastic part, but this does not consist of a single plastic block, but has a special shape. From the side he looks like an outstretched arm! The genius of it is that there is still a free space under it, hence the name? FREE ARM ?. From the left side of the machine one can touch the free arm with the fingers of the left hand, as if one would touch a box from the narrow side.
Such a free-arm is of immense advantage if you want to sew closed parts such. As sleeve cuffs, trouser legs, bag top edges, edges on hats, leggings ... - So in all textiles that do not look like a surface fabric, but already sewn together at one point, so tubular or? Round? are.
How do you use such a free arm?
The inside (!) Of such tubular textile parts is pushed from the left over the free arm to where the sewing machine needle meets exactly on the desired / selected seam line and you can sew exactly there! The often large remainder of the project then hangs sideways from the free arm - the main mass of fabric rests on the table during sewing. The guiding of the material during the sewing is now very easy, because you can lead it - practically as in a circle - away from the body according to the sewing speed around the free arm (do not push !!!) and the material hooks anywhere on the machine! You're going to say that's all fine and good - but what about very tight parts for which the free arm is too thick, so you can not push it over the free arm? If z. B.Parts of jersey fabric or knitwear parts are narrower and seemingly do not fit over the free arm ?, then you resort to a trick: this type of fabric can be stretched for a short while, in this stretched state over the free arm pull / push - then once Sew around, secure the seam and immediately afterwards remove from the free arm - done !! This short stretching does not harm any material.
Here is a tip: Please check to see if you can not convert your own machine to a free-arm machine:
For some machines, you can pull off the extension table, which is possibly around the needle plate, to the left completely to the left of the machine - this turns the machine into a free-arm machine! Or: Under the needle plate is a box with accessories that you can pull away to the left and then a free space under the? Arm? has, so also a free-arm machine! Do you need to check your machine or take a look at the user manual? it is worthwhile in any case! Otherwise, only Santa Claus helps, because since today it says: no longer without free-arm machine!
Before I forget it: All machines that do not have a free arm are called Flacharm-Machinery.
We all enjoy sewing!


