Sew handle pad for backpack
Often you can see on backpacks a handle cover, which is made of hard plastic. Depending on use, this can break quite, so stood in the room, then but a handle pad itself to sew, so that the incorporated webbing as a carrier belt is not so in the hand and / or squeezes itself always ...
materials
- Artificial leather or other robust material
- Vlieseline S320 for reinforcement / light valance insert
- Sewing machine with microfiber needle, yarns, for quilting from the right perhaps a stronger upper thread
- Ironing board, iron, cloth to cover when (damp) ironing
- Velcro, sew-on or push buttons / diam. depending on the condition / width of the handle itself and the processed materials ...)
- if necessary binding tape
- fabric scissors
- possibly cutting mat, patchwork ruler and rotary cutter
- Falzbein for shaping the corners
- if necessary Teflon-coated presser foot
- Baking paper - sandwich paper
- Stylefix (narrow double-sided adhesive, without problems for the needle überähbares (!) Tape - just great!
The finished cushion should be in the unfolded dimension rectangular and quasi three-parted, because at one of the three "parts", the surface of the handle pad overlaps (see drawing picture ...)
There are two ways to attach the belt pad to the handle of the backpack:
- with two snaps on either side of the handle pad or
- with Velcro
Which variant one chooses, z. Depending on what you spontaneously have the materials already in the house or the type of workmanship, the one from the optics ago like ...
Preparatory work steps for both variants
- Remove the old handle pad - this is where the lashing strap (Henkel) hides.
- First, the finished length To measure the new one: I put my hand around the grip band, added another centimeter to the right and left, so that the backpack can also be worn well by slightly wider hands, and then mark the end points on the carrier belt with a pin. With me there are 10 cm.
- The finished one width of the handle pad results - as mentioned above - from 3 x 2 cm (belt width) + 1,5 cm "surcharge", because the thick material loses width when wrapped around the carrier ...- in total 7,5 cm.
- The finished dimensions for the cut are therefore 10 x 7.5 cm (without seam allowance - please take this into account individually = as it is best to sew on your own sewing machine and / or with your favorite sewing foot).
- Cut out two artificial leather surfaces (take into account the individual seam allowance!) And two Vlieseline S320 surfaces - the latter in any case without Seam allowance, because otherwise the corners of the finished handle pad can not be shaped so well, because they would be too thick / stiff ...
- Iron the saddle pad according to the manufacturer's instructions under a damp cloth on the left side of the artificial leather surfaces. Carefully remove these areas of fabric from where they have just been dampened and place them on another = dry area of the ironing board. Dry out here for 30 minutes and allow to cool, so that the adhesion can reach their full effect (this cooling time is unfortunately often underestimated ...).
- Place both artificial leather surfaces on the right side and stitch them with the personal seam allowance - starting at the later turning opening and ending again. At the corners, I always sew at least one oblique stitch - have had good experiences with it ...
- Bevel 2 x corners (see picture ...)
- Push the pad through the turning opening from inside to outside ...
- Shape the corners with a piece that is not too sharp.
- Prior to the last pressing of the edges, the seam allowances in the area of the turning opening should be glued together if necessary with Stylefix, so that they can not move against each other.
- To top off the handle pad with non-slip materials (and this includes artificial leather) Place baking paper in the format slightly larger than the handle cushion surface on the feed dog, then on the handle pad. Sew this once around narrow-edged, using a thicker and thus striking decorative thread as desired - do not set the stitch length too small - adjust the thread tension - if necessary use a Teflon sewing foot, which optimizes gliding.
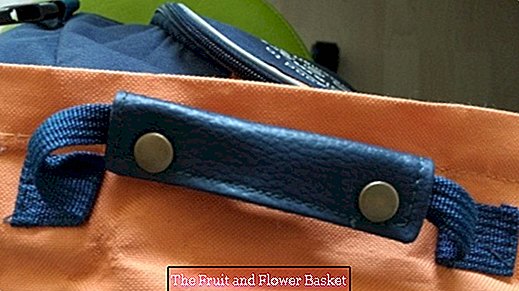
So, the handle pad is now prepared in shape and size for attachment to the backpack handle.
On the handle padding, either Velcro strips are sewn on the long edges in the last work step or push buttons are incorporated, with which the cushion edges are fastened to each other, so that the pad can not move. It can easily be removed at any time (perhaps before washing the backpack) and / or sometimes on another bag ... used.
The finished sewn upholstery surface may be spread out in total three composed of identical large surfaces imagine (see image ...).The fully finished handle pad is finally placed in the middle under the strap of the backpack ..., the back third folded upwards and the front third from the front over it: If you take the handle of the backpack in your hand, this engages from the front to the closed Edge of the handle pad - the open edge is then towards the backpack back.
Details on 1 - Fastening with push buttons
In this my first (!) Grip pad I will improve the next project in two places:
- The width of the cushion with even more "margin" provided, so instead of the above-mentioned +1.5 cm, better +2.5 cm or +3 cm.
- Do not attach the pushbuttons too far in, but at a distance of only 1cm from either side of the corners where they should be hit. My first holes were at a distance of 1.5 cm to the corner edges - this proved to be too far away, because the mating holes should have just such a distance. After trial-and-error loops around the edge-punched pad, it was found that its dimensions were too small for later buttoning. That's why I hit the mating holes at a small distance from the corner edges - not super-correct, but at least I could close the padding. However, I had to fold the carrier tape once in the middle, before I could loop around and close the pad:
Conclusion: Significantly generous!
- Mark the point on an open edge of the handle on an edge at a freely chosen distance from the corners = pierce the hole, at which the later top of the push button is taken. The tops are later visible after completion of the handle pad in the "folded" state on top.
- The handle pad in the middle put the carrier belt.
- First fold the still unperforated opposite outer surface / edge onto the carrier belt - then fold the already perforated surface onto it like a sandwich.
- Use a sharp object / pin to pierce through the holes in the holes above and onto the holes for the hole lower part of the push button.
- The push buttonTops Incorporate according to the instructions for use.
- When smashing the two Bottoms note that the push buttons do not B. on a jacket by pressing them together, but that the second part to be hammered quasi the other way around must be incorporated, because the pad so once again folded around the carrier belt and only then the push-button parts are pressed together - this can also be seen in the photos.
- Attach the finished handle pad around the strap so that the tops of the snaps are visibly up, and the closed edge of the pad surrounds the front strap edge (the one from which you grasp the handle). The handle pad feels nice and soft in the palms -Inner ...
More about 2 attachment using Velcro
Steps:
I decided to attach press studs, but below I described the possible steps for attaching the Velcro tape and explained them with a drawing (see photos).


